
Cut a piece of 12x12 Cardstock to 7-3/4 x 12". Set the extra piece aside, you will use this later to make the belly band.
Using a Scor-Pal, line the short end of the cardstock against the left side of the Scor-Pal and score at 1". (If you don't have a Scor-Pal, use your method of choice to make the score marks). 5-1/2",
  6-1/2",
  and 11".
5-1/2", 6-1/2", and 11". FOR SCOR-PAL USERS: Turn the paper so the long side is against the left side of the Scor-Pal  and score at 1".
  Now slide the cardstock toward the right side 1/4". That would be the second line from the left side.
  Now score at 7".
and score at 1". Now slide the cardstock toward the right side 1/4". That would be the second line from the left side. Now score at 7". FOR NON SCOR-PAL USERS: Score at 1" and 6-3/4".
Now to make the cuts:
On the LONG side of the cardstock make 1 inch cuts on EACH score line only up to the perpendicular score line.  Do the same thing on the opposite long side. Make an additional angled cut at the left edge by trimming just a hair off,
 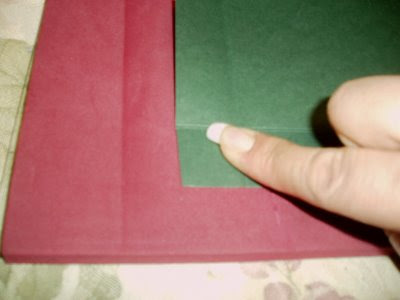 the 5-1/2" line,
  and the right edge.
  These slight cuts make assembly much cleaner and straighter.
Do the same thing on the opposite long side. Make an additional angled cut at the left edge by trimming just a hair off, the 5-1/2" line, and the right edge. These slight cuts make assembly much cleaner and straighter.Decide which side you want the top to be and make a small x on it.  On that same side, use your circle punch to make a half moon cut on the edge so that the box can easily open with your thumb.
On that same side, use your circle punch to make a half moon cut on the edge so that the box can easily open with your thumb. I used a 1" circle punch and you just slide your paper in halfway and punch.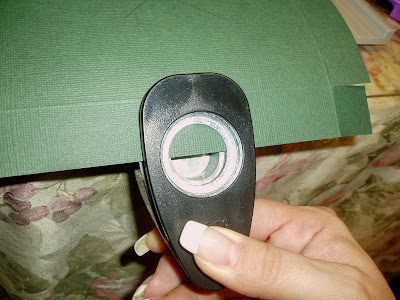
Next, attach your decorative piece of paper to the top. This piece should be cut to
4-1/4" x 5-1/2". (Not pictured)
Important: Now flip your paper over so the X is not visible and it's facing the table.
Fold up the "tabs" that your previous cuts just made. Flatten them against the cardstock when you fold them up.  This is where you place your adhesive (on the side facing up).
  I use double sided tape. It holds very well! I cover the entire tab with tape. Cover all 6 tabs and begin to assemble your box.
  I start with the bottom of the box, making sure to line up the top edges. Make sure your tabs are stuck inside the box so they are not visible. If you put your adhesive in the right spots your tabs can only get stuck on the inside anyway. LOL Below is the top of the box. I haven't added the decorative piece yet.
This is where you place your adhesive (on the side facing up). I use double sided tape. It holds very well! I cover the entire tab with tape. Cover all 6 tabs and begin to assemble your box. I start with the bottom of the box, making sure to line up the top edges. Make sure your tabs are stuck inside the box so they are not visible. If you put your adhesive in the right spots your tabs can only get stuck on the inside anyway. LOL Below is the top of the box. I haven't added the decorative piece yet.Now you can do the belly band. Cut the leftover piece of cardstock that you aside at the beginning. You need two pieces each cut to 2"x9". Hold one piece against the box with the short edge aligned with the top of the box.
 Now slide your thumb and forefinger down the box along the strip and pinch the strip where the edge of the box is, as shown below.
 This will make a nice crease right in the right spot. Now turn the box slightly so that you can crease the next edge, as shown below.
 Set this piece aside and do the same thing to the other strip of cardstock.
 Once you have them both creased well, you need to attach them together. This is how they will stick together....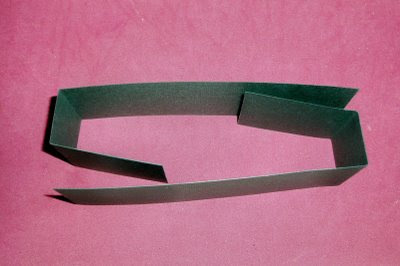 each short flap is attached to the INSIDE of each long flap. So that all you see on the outside of the box are long flaps. The short ends will be hidden. Place adhesive on the short sides as shown below.
each short flap is attached to the INSIDE of each long flap. So that all you see on the outside of the box are long flaps. The short ends will be hidden. Place adhesive on the short sides as shown below.When sticking the two strips together, take the edge of one LONG side and lay it down on the SHORT side of the other strip. Be sure to come just short of the first crease. Don't line the edge and crease up perfectly. You need about 1/16" of an inch space between the crease of one strip and the edge of the other strip, as shown below. My two strips are adjoined at the crease on the right and there is the slightest amount of space right there. This allows a little extra room in the band so that it slips on an off the box easily. Attach the other end the same way. 
And voila, you have a belly band and your completed box. Decorate as you wish! :)  Hope you enjoyed this tutorial! If you have any questions, please let me know. Thanks so much for stopping by and have a wonderful night!
No comments:
Post a Comment