Monday, May 26, 2008

Katie's Graduation Announcement


I managed to get Katie's announcements done today.....well some of them! LOL. It started out really simple with just the layers of cardstock. Then I added the stamping. I couldn't figure out what to do with the top black square with the limited graduation stamps that I have. So I decided to get my cricut out and cut out the year. At first I was going to rest the cap like a hat on the first 0, but then I got the idea to hang it and take up some of the space below the year. I love that part! LOL Then I added the stars at the bottom, which are brads and the yellow brads at the top. I wanted to spruce up the very bottom so I punched holes along the bottom and added a little dot between each hole with my glitter pen. I put yellow cardstock behind the holes so they would show up nicely. The card looks much better in person. My camera is yucky! LOL What do you think?

Thanks for stopping by!!!

Sunday, May 25, 2008

Recipe Box #2

Here is my other recipe box. I like this one better. This isn't the one I am teaching in my class because the people taking the class don't want the dimension on the top. So this is for my own personal use. This one is made the same way basically. I didn't mat the letters on the front and I cut out extra fruit and raised them with pop dots on the lid. I also added a ball to the top to look like a handle. My dividers will look a little different but I haven't finished those yet. I will post those pics when I get them done. :)

Thanks for stopping by! Have a great weekend!

Star Book

I am teaching a class in June on the star book. I was going to use the other star book that I made but decided that one was too much work for a 2 hour class so I came up with this one. I love the colors!
I used book board for the front and back covers and I used mulberry paper and a glue stick to cover them. The ribbon is attached with red line tape. The stamp on the front is from Hero Arts (my favorite company right now). I used chalk, a glitter pen, and markers on the cover.


On the inside pages, I used a variety of stamps including Hero Arts and Kodomo. I used a lot of different chalk colors around each page. The stamping was done with markers and NOT ink pads so I could get a variation of colors on the stamp. After "coloring" the rubber, I "huffed" to re-moisten the ink and then stamped on the cardstock. I really love how this one turned out. Star books are easy to make. Depending on the size you make them, you can use very little paper. This one is 4x5 because that's what size the book board was. That stuff is really think and hard to cut so I just changed the size of the cardstock.
What do you think? Thanks for stopping by!


Recipe Box

It's been a while since I've posted! Sorry about that! I am anticipating that June is going to slow down for me as far as work goes. At least I hope so! My boss is supposed to come back to work on June 3rd, but I haven't heard from her in three months so we'll see if she does come back! Her vacation was supposed to be 2-3 months long and she is taking the whole 3 months. How nice, huh?

Anyway, I don't want to get started on that whole story! I have managed to make some things during my absence! The only reason I did however, was becuase they are samples for classes! LOL

The first one is this recipe box. I love how it turned out! I found this great box by Darice at Michaels. It's larger than the average recipe box. It will accomodate 5x7 cards. I dont' know about you, but I can't fit an entire recipe on 4x6 cards! LOL. The paper is from Flair Designs and I found that at Joann's. They have several different papers that coordinate in this "food" motif. The look aged so it makes the box look like it's from your grandmother. Of course, I added chalk ink to all the edges to further emphasize age.

I used my cricut to cut out the letters to spell recipes and for the dividers I used letter stamps on my Stampa-ma-jig.

I used a glue stick for the entire project, including the tabs. I used my craft knife to go around the hinges and the inside of the lid. I attached cute little feet to the bottom as well.

I just love this paper! What do you think?

Monday, May 5, 2008

PIctures of the fall...last year

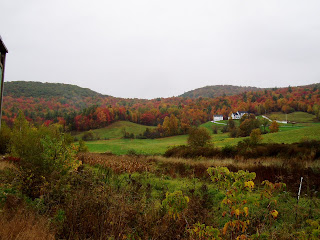
Boy I am just finding all kinds of pictures this morning! LOL. I came across these while posting the mural pictures and I had to share them! These are pictures from last fall in an area about 30 minutes from here. This is my favorite time of year! Vermont is just amazing in the fall. Some years, the colors are more vibrant than others and I am not sure what determines the changes every year, but I have to take pictures! Last year though, was our first official leaf peeping year. We got in the van and went driving for the purpose of looking at leaves! LOL. Aren't they just gorgeous?


These next pictures are in a different area, still about 20 minutes from our house. This is in a town called Jericho. I love this picture of the church off in the distance. It was a little hazy that day but still beautiful! This picture of the road is in a neighborhood on the other side of the church.
I love the bright orange leaves!


This old mill is in Underhill, I believe. We were driving through town and passed this on our left.
I had to stop and take a picture. See the stream that flows next to it? You don't have to drive very far to see some amazing landscape!! Have you visited Vermont yet?? :)

Dogs...

Look at my dogs! This is hershey and he is laying in a bed that is too small for him. LOL He is laying on his back with his head hanging over the left side! What a dork! Then later, I caught Jazz on the couch in the basement! He's too big to be on the couch! Just wanted to share....

A Mural I Painted

Good morning! It rained all weekend and today is supposed to be nice and sunny and much warmer. Right now it's at 44 degrees! Still a wee bit chilly! Didn't do much over the weekend. Just hung around the house. Actually, I did clean quite a bit yesterday. Mopping, vacuuming, vacuuming the stairs....YUCK.......I hate that! Laundry is never caught up though!


I wanted to share with you some pictures of a mural I painted last year. I think this was before I started my blog so I didn't post them. I came across them this morning and thought......"I should post these since I mention painting on my blog..." The picture you see here is a before picture of a paint store. This is a children's area they set up in the back of the store. They wanted something more vibrant and colorful. The owner definitely wanted a beach scene, and wanted it to span across the two walls. Well I love love love painting murals so I was so excited to do this! His request was to keep a chalkboard area on the wall and I said, "no problem."
After many sketches we came up with a plan for palm trees, beach, sailboat, mountains, island, greenery, a dog, and kids playing in the sand. Well.......I don't do people!!! So I was really nervous!! I started with the sand and water, tree trunks, and a little bit of greenery...easy and fun! I decided to move the position of the chalkboard from the wall on the left to the wall on the right. You can see a tiny portion of white wall remaining where I planned on putting the chalkboard. Then I worked on some clouds; clouds are fun too!
Then I started on the island and mountain and the palm trees.
The following day, I started on the sun, the umbrella and chairs.

I left a space for the sailboat. Here is the space I left for the chalkboard....and added a tiny little island above that. Islands, water and sand are really easy to do. I kept the hard things for last......like people! LOL
Then came the doggie and the ball.


I am not thrilled with the color but I like that he is running through the grass. I think he came out too dark.

Everytime I tried to lighten him I wasn't happy with how he was turning out, so I left him alone. The only way to make him lighter at this point was to white him out and start over, and I didn't want to do that. I do like how my ball came out though. :) Then I added my little sailboat....isn't he cute?
LOL I put the palm trees on the island as well. I like making crooked palm trees. It drove my husband crazy but I told him "they can't be too straight!"
After that, I made the waves on the shoreline. That was fun! Sorry about the shiny spot in the middle! It was really hard to photograph after I put the topcoat on.
Here you see the canopy of the palm trees. Palm trees are really easy. And they take up a lot of space! LOL
Here is the end result. I can't show you a close up of the people...LOL. You can see them though on the left. LOL. The big black square is the chalkboard paint. It's a really cool thing, actually. Just paint it on like regular paint, let it dry, and then you can draw on it with regular chalk! Love it! Here is the wall on the left side.
Overall, I am happy with how it all came together. I am no Picasso and don't claim to be one. I got a lot of ideas from various websites. This too me 4 full days, if I remember correctly. Notice how the color of the floor matches the colors on the mural. That wasn't intentional. People have asked me if they replaced the floor after I painted, but that floor was already there. There was just an area rug covering it. And while I was painting, I had it covered with a dropcloth so I didn't notice that it was matching! LOL. I would paint another beach scene in the future but without people! LOL


.