Tuesday, September 30, 2008

Fall Card.......4th post for today!!!

Starting to get in the Fall mood! The leaves are changing here and I think we are going to have an early "peak" this year! I love this time of year! I just love this stamp from Serendipity Stamps. I used Staedler markers and my SU blender pens to color it in. I stamped it on vanilla cardstock by the way. Then I adhered that to Really Rust and then Ruby Red cardstock. The card is made from Kraft cardstock. I added copper brads to each corner. I really like how it turned out! What do you think? Thanks for stopping by!! Have a wonderful night!

Inkadinkado Sympathy Card

My boss asked me to make her a sympathy card for a friend whose son recently passed away. I looked at sevearl of the sympathy cards on SCS and these two struck me right away. The first one is from stamps4sanity, and the other is from angelladcrockett. I love the nighttime scenes. They are so beautiful. My moon is punched from my 1-1/8" punch. The sky I sponged on with Marvy Matchables Dye based ink pad Prussion Blue. I don't have SU's Night of Navy. I then stamped the birds and then the swirls. I really love how it turned out. I added some clouds in front of the moon because the moon wasn't completely crisp all the way around. This card ended up being 5x7. Luckily I had an envelope that big! Thanks for stopping by!

Purple Haired Witch!

Okay, I couldn't decide which color hair to use, purple or orange. In the end, I chose purple, with an orange bow! :) My husband doesn't think she's a witch. He called her a female gobblin or something and my 6 year old daughter thought she was an alien! LOL. She's got a wart on her nose! And she has one snaggle tooth. Hubby thought she needed a hat. Well if I added a hat then the card wouldn't be standard size! I saw this candy box from Carole and I loved the eyelashes! So I had to add eyelashes to my witch! And the hair was just haphazard cutting! LOL Pretty funny! The eyes were punched with 1-1/8" and 1-3/8" circle punches. The nose is SU's smaller oval punch. And the wart is a 1/4 inch punch. LOL. Then I added those cute little freckles! The ribbon is from Michaels and has little witch hats on it. I wanted to add bats in her hair but it didn't look right. After I assembled her, I added purple stickles in her hair. Isn't she just gorgeous? LOL

Frankestein!!

I had to try this Frankenstein that I have been seeing a lot of lately! He is so easy to make with just a couple of punches and scissors! I used the 1-1/8" and 1-3/8" circle punches. I wish I had the grass die cut that akjuda uses on hers but I don't, so I just free handed his hair with scissors. In both of these pictures, I couldn't get the right angle to show that his eyelids and nose are raised with dimensionals. Sorry about that. But they are so fun to make. I crack up laughing every time I see him! LOL Don't you think he's cute?

Saturday, September 27, 2008

Prayer Request...

I came upon this post this morning from Cammie. I don't know the family she is speaking of but when I clicked on the link she provided and saw pictures and read her post, I felt compelled to post her story. (Click on the word "story" in the previous sentence and it will take you directly to Christine's post). She and her husband Caedmon, lost their 13 month old daughter on the 23rd, just 4 days ago, after a very brief and unexpected illness. Her funeral is today, and as I write this post, they along with family and friends, are at her visitation in Texas. Her funeral follows right afterward. I can't even imagine what they are going through.........I was speechless when I read their story. So I am asking those of you reading this post to please pray for her family, and keep them in your thoughts today, and in the days ahead. After the funeral, when all the activity is over, and the visitors have left, is the most silent and painful time. I have buried my brother, both my parents, and both my in-laws. I can't describe what that time is like; it's just devastating and lonely.

Thank you so much for reading this post, and for your friendship. It's amazing to reach so many people with just this little keyboard in front of me. It's during times like this when all your thoughts are greatly appreciated!

Wednesday, September 24, 2008

My First Bind It All Book!!

OMG I actually finished a project! LOL. It's my first Bind It All book! I had covered these coasters about a month ago and they sat and sat. I was afraid to use my BIA! LOL. So tonight after work I decided I was going to do something with them. I used my little owl from Hero Arts and stamped him 4 times. I colored them all different colors to match the DP. Then I cut them out and placed them in the centers of three flowers and used one for the "O" in Notes. I love it! LOL So cute! Not so scary that BIA! What do you think? Thanks for stopping by!

Tuesday, September 23, 2008

Baby Journal #2~Edited on November 2nd, 08

** Edited November 2nd, 08 ~ I was asked how many sections are in this book and how many pages are in each section.....Sorry I didn't include that info before. There are 12 sections and about 8-9 pages in each section. I changed the amount slightly in certain sections because I knew that I might have more writing in one section versus another. When you make your own, you will know just where to add or subtract pages. :) Thanks so much for the question and your interest! **

Here are a few more pictures of my baby journal and some details about how I made it. I started with an ordinary regular sized composition notebook that you can find in any office supply store, grocery store or discount store. I first covered the entire book including the spine with solid color cardstock. I used a wet glue that I brushed on called Perfect Paper Adhesive. I found this at Michaels. I placed something heavy on top of it and then let it dry overnight. I then covered the cardstock with pattern paper leaving a pink border all the way around. I stamped a bunch of babies with black ink and did the watercoloring technique withe markers and SU blender pens. I LOVE this way of coloring! I then cut them out and cut a piece of coordinating cardstock to adhere along the left side of the book. I adhered the babies and then trimmed around them leaving a 1/8" border of blue/periwinkle showing. I then attached a strip of different pattern paper along the left with two different ribbons. The tabs I stamped using my Making Memories magnetic stamp sets. You can find them here. I used my Stamp-a-majig to center them on the tabs. I liked the idea of using these words versus other ones because someone could use this book starting from birth for several years. It isn't dated with the year or separated by age in any way. So someone could just journal things like when their baby was "naughty" or "discovered" something. I thought it was a cool idea. As you can see, these sets come on different fonts, not all the same font included in one set, so that's kinda cool too. Oh I forgot to mention that the other stamps are from Outline Stamps. I used two different baby ones.
Along the side of the paper where each tab is, there is a 1 1/2" wide strip of pattern paper. I added this under the tab to provide extra strength. The strip is 3 inches wide and it's scored at 1 1/2" and then wrapped around the edge of the paper. This is also glued on with the same wet glue I mentioned earlier. Then I added the tabs using the same glue. I thought it would be cute to have someplace to add the birth announcement, so this is adhered to the inside cover.
I also added a bookmark. The ribbon is sandwiched between two pieces of yellow cardstock and the stamped image is only on one side. The end of the ribbon is attached at the back of the book between the cardstock cover I added and the cover of the book.

So that's it. What do you think? I really like how it came out. Now that I know the measurements and know what I am doing, the next few won't take me so long! LOL Thanks for stopping by! Have a wonderful night!

Monday, September 22, 2008

Baby Journal

As promised I finished my baby book today and here are the pictures! Yay! I have to post a few pictures of the process and some dimensions but I don't have time to do that tonight; gotta get up for work! LOL. But this is the finished product, and I am SOOO happy with how it turned out! It only took me like 4 days to complete! But now that one is done I could do more much faster! This started out as an ordinary composition notebook (standard size) and I covered it with DP, cardstock, and ribbon.
All of these divider tabs came from Making Memories Magnetic Stamp Sets. I will post the link to all the supplies tomorrow night after work. I will tell you though this was a lot of fun to make and I can't wait to make one for boys.
Thanks for stopping by! Have a wonderful evening and I will see you tomorrow! ;)

Happy Monday Morning!!

Really? Is there such thing as a happy Monday morning? After sleeping in all weekend, Mondays are really hard for me! I don't like Mondays. However, my store is closed on Mondays so I don't have to get ready for work! Woohoo! LOL. My little ones are off to school and I am getting ready to leave to take my eldest to school downtown. Then I am coming home and finishing a baby book that I have been working on. Right now, I am adhering the tabs in it. I am totally excited at how this is turning out! I wasn't too thrilled when I got parts of the cover on it, but I managed to work through my creative funk! Yay! Don't you hate those days? It's really hard to come up with anything creative on those days. I seem to have more of those than any other!
Anyways, I am going to post those pictures today and then start working on other things for my upcoming craft fairs! Katie and I are doing a few together, so that will be fun!
Thanks for stopping by; check back later today! Have a wonderful day!

Tuesday, September 16, 2008

Thank you's!!!

Hi guys! Hope you are having a good night! I am just checking my email and then heading off to bed. But I wanted to say thank you to Connie in Michigan and Pearl in Montana for the beautiful cards they sent recently! I love happy mail! It's so fun to go to the mailbox and find cards with happy little notes in them! :) I love my pen pal group! It's been an awesome addition in my life for the past year+. Thanks ladies for being such wonderful new friends!

I thought I would have finished my baby journal last night but I spent a lot of time coloring the images and didn't get much farther than cutting them out! LOL Maybe I can sit down tomorrow night and get a little farther! We'll see. Hope you have a wonderful evening! Thanks for stopping by!

Monday, September 15, 2008

Saturday Night Live...

I don't watch the show because I can't possibly stay up that late anymore! You know you're old when you don't count your birthdays anymore, don't look forward to birthdays anymore, have to think for a LONG time when someone asks you how old you are, and bedtime is 9 o'clock!!! That's me! 37 years old and can't stay up for SNL!! LOL But it's great when you wake up in the morning to get the kids off to school and on every news station, you see snippets of "Palin" and "Clinton" standing at a podium together speaking to the nation!!! OMG! It was so funny I had to go to the SNL site and see the skit in its entirety. If you are like me and can't stay up that late, or you are like me and saw snippets and now want to see the whole thing, here is the link. If you clicked on the word "here" and nothing happened, here is the link again. http://www.nbc.com/Saturday_Night_Live/video/clips/palin-hillary-open/656281/
Note: I am no means trying to be political or voice any opinion whatsoever!!! I just thought it was funny!!! So please don't take offense to my mentioning it. I think it's hilarious when SNL can copy anybody and do it so perfectly! ROFL!! Anyway, check it out if you haven't seen it already.

Now I am off to make a baby book/journal thingie. I will post it when I am done. Have ideas floating around in my head and have to jump on them when it happens! LOL Thanks for checking in!

Sunday, September 14, 2008

I tried to be creative today...

I tried to get something done today but I just couldn't pull it off. Too many interruptions and I really have to be in a creative mood to make anything decent! Instead I blog hopped and scrap-lifted. I also did some laundry and went grocery shopping. I am off work tomorrow so maybe I can get something done then. I do have an idea floating around in my head but to actually sit down and do it is another story! I've had a nagging headache today too. So I have no projects to share with you. Sorry.....but I could share with you some painting that I did. I didn't do this recently, probably about 6-8 months ago I guess. This is my dining room. However NONE of that stuff below the picture is there anymore! LOL (I love to re-arrange stuff). This is done with a solid color gold basecoat and then a darker glaze on top, applied with a brush and then smoothed out with a rag. This is one picture that came out okay! LOLThis is my kitchen. I used to have ordinary brown oak cabinets. Since I have very few windows in my kitchen, this new paint job lightened it up quite a bit! This picture was taken during the winter months and the kids were getting ready for school; thus the backpacks on the stove! LOL This was done with an off white base coat, two different colored glazes applied with a dry brush and ragged off and then several top coats. This isn't in my house; it's a client's home. This is in their entry to their condo. This wall started out white. The owners wanted a linen finish, so this was done using different colored plasters and a trowel and brushes. Not something I would want in my home but they liked these colors. This short wall you see when you enter from the front door and also from the garage door. The white wall is a hallway that leads to the living room.
This long wall was shot from the living room looking toward the front door. Crazy colors, huh? LOL

So that's it. Not what I normally post .....LOL. I don't paint much anymore but this is just a little of what I have done. I will post a project tomorrow if I can focus long enough to finish one! LOL

Thanks for stopping by! Have a wonderful evening!

Saturday, September 13, 2008

More of my room...

Happy Saturday! Just got back from Michaels; didn't get much just some adhesive and stazon cleaner. I had some of the inkadinkado clear stamp sets in my hand but then put them back. LOL
I wanted to share the last of my room pictures with you before I start working on some projects. This cabinet is on the right side just as you enter the door. This cabinet is full of "stuff." Albums, pictures, supplies, you name it. It's a mess as well! LOL. That why I love that it has doors! :) The canvas thing hanging on the door holds my smaller punches and different fibers that I use for scrapbook pages.


This is a picture of my desk that my computer is on. It's also on the wall to the right. There are two desks butted against each other so it's in the corner. Those little drawers are full of little things like buttons, bottle caps, pom poms, key rings, staples, letter brads, etc. Then I have several boxes lines up on the wall (with my kids' artwork above it!). Then you see just a small portion of my computer monitor all the way to the left.


Then you see the other desk that my computer stuff sits on. Above it on the wall is more pegboard and shelves. I have photo boxes with miscellaneous stuff in them. This picture was taken before I cleaned my desk off so it's a mess! But it shows the shelves and my punch storage. I need to put curtains or something on the edges of my desks cuz I hate to see the mess under them! LOL


There is my printer and my phone and it sits on some drawers that have more buttons and templates and magnetic stamps in them.
This is the wall that is right next to my punch storage. It's another section of pegboard. I purchased a bunch of plastic bins the size of shoe boxes and drilled two holes on one long side so that i could put a hook through the hole and then hang the box up on the board. At first all the contents were organized in these bins but I have since moved things around and these bins are no longer organized. They just house "stuff" that has no where else to go. LOL
This wall is opposite the wall that my other desk sits on that I showed you in my previous post.
So that's it. There's my room. It's messy to everyone else but believe it or not, it's organized to me and I know where everything is. LOL I'd love to see what your rooms look like; it's always fun to get new ideas!
Thanks for stopping by. Now I'm off to start some projects. We'll see if I actually get anything done. LOL

Tuesday, September 9, 2008

Happy Tuesday! A funny story for you....

I just have to share this with you all. It wasn't funny at the time but it's funny now...........enjoy!!

Last week, while I was working alone because my boss was extremely sick, I was driving to work on Wednesday morning. I left my house at 8 am, jumped on the highway only a mile away, and began my 25 minute trip to work. About 2 miles into it, traffic comes to a dead stop! Not good when I was meeting our delivery truck at work and he was expecting me to arrive at 8:30! Well, I remain optimistic hoping that traffic will start moving again, which it normally does because most of the time, the cause is a stalled car or a fender bender. And the lookey loo's are just slowing down to stare at whoever is on the side of the road. LOL However, this trip was entirely different! I sat, and sat, and sat, and sat in the same spot for a LONG time! I moved forward maybe inches at a time and I wasn't making a lot of progress. 8:30 comes and goes and so does 9:00. I repeatedly call home to talk to Jared about the highway situation, and he says, "poor honey....." He then says, I am interrupting his morning news shows! LOL. So It's about 9:30 now and I am still only about 8 miles from home. There aren't any exits between my exit and the next town which is 10 miles. And I start seeing people pulling over to the shoulder to run into the woods to pee!!! LOL I think to myself, okay this isn't good! The only option is to find a U-turn in the median, which is illegal to use, but at this point.......who cares right? LOL So I am now in search of a U-turn and can't see one coming up. All I see is forest between the southbound and northbound lanes: big wide forest! LOL Well, I gotta drive through it, right? I mean, I can't sit here and just wait. I had already thumbed through my entire issue of Paper Crafts! So up ahead, about 10 cars up, I see trucks turning off into the median and disappearing into the woods! I think to myself, "oh can I do that?......those are big trucks!" Then I see a four-door sedan go down the embankment and into the woods, and I think, "well, if she can do it, so can I!!!" So when I reach that point in the road, I hesitate, thinking what if I get stuck in there? Then I decide to just go for it and I turn left and go down the embankment. It's so steep that I actually was afraid I was going to bottom out and get stuck with the nose of my van in the ground! It was a lot steeper than I anticipated. It doesn't look so bad when you're driving 70 miles an hour past it on a normal day! LOL But I make it down the embankment and here I go........four-wheeling through the forest! LOL I start getting nervous as I enter the woods and realize that yes, there's a little path carved into the dirt already from the other cars but I was driving over tree roots and through the branches! LOL. It's also dark! ROFL!! So about 200 yards later, I get to the other side and I come to another steep embankment! Oh man, if I have to slow down for traffic at the top of that embankment, I am not going to make it and I am going to get stuck for sure! Just what I need.........get stuck doing something illegal cuz I want to get to work! I figure my only option is to gun it! LOL I look to the right and see no cars coming so I nail my gas pedal and hope for the best! ROFL I get on the road and my heart is just pounding! I look in the rearview mirror and see several more cars and trucks doing the same thing. So now we are driving back north, opposite direction of work, which is really making me mad, and I am just flying on the highway! LOL My part of the state has ONE highway and that's it. The other option for travel is to take Rt. 7 which is the old way of getting through the state before the highway was built. So I get off the highway and start going down Rt. 7. About half way to work, I am on this back road and suddenly, traffic stops! OMG.......are you kidding me??? What the heck is going on???? LOL. I guess everyone else had the same idea and now this back road is stopped and we aren't moving anywhere! In front of me is this SUV......husband is driving and wife is hanging out the passenger window. At first I thought she was looking at something on the road. And I am thinking........how far do you have to hang out the window to look at something! LOL........well, she isn't looking at anything......she starts barfing because she's car sick and has been stopping and going for so long! Poor thing! I felt so badly for her! So after almost 3 hours, yes.......... 3 hours............I get to work and the guards are standing a the front gate tapping their watches and laughing at me! Haha, yeah real funny! LOL And my delivery truck is still sitting there waiting for me. :) He was very nice and understanding though, which was great! All day long, soldiers and customers are coming into the store with the same story as me. Some people were on the road for 5 hours! Vermont is NOT good with things like this! LOL. Come to find out, there was a power line down across both lanes on the southbound side and everyone thought it was a live wire, so traffic stopped and no one wanted to drive over it. So the highway was shut down, authorities took forever to get there to do any traffic control, and people had to try to make it around this wire and get off the highway. In the end, we found out it was a CABLE wire that the cable company had accidentally knocked down! Can you believe that? What a nightmare that was! Every day since then, I have looked over the bridge before getting on the highway to make sure traffic is flowing! LOL Can you imagine if this happened in the winter?

Thanks for stopping by! Happy traveling!

Friday, September 5, 2008

Wanna see my room???

I thought I would share my craft room.....I'm not sure why since it's a mess......actually it's not a mess anymore.......at least not to me..........I think it would look chaotic to someone else but it's an organized chaos for me! LOL My work station is a old oak door that was turned into a table. The previous owner left it behind when we bought the house. He used this same room as his workshop so that's why there aren't any walls or a ceiling. We covered a lot of the walls with pegboard which works for me. On my table, I have a table cloth and a sheet of plexiglass on top of that so it's nice and smooth. When I sit at my desk, this is in front of me. My little glass jars with scissors and pens and stuff is right in front of me. I have a wooden spinny thing that has bigger scissors and items in it. Behind the wooden spinny thing is a blue container hanging on the pegboard. It's the kind of organizer you might find in your husband's workroom with screws and bolts in it. It holds my eyelets and brads. I have them separated by color. Above that, hanging on the wall are clear buckets hanging by hooks. I just have various things in them. I just hang stuff that I need easy access to. I have adhesive refills, extra tape, brayers, rulers, glue dots, pop dots, etc hanging on the wall. Can you see the tupperware things stacked up? Those are filled with embossing powders and glitters that I use a lot. Next to it is a box of cards that I have recently made. Yes it's a tuna fish box! LOL


Okay moving to the left on my desk are more drawer units. There are two units stacked on top of each other. I have lots of prima flowers, glitters, embossing powders, and some buttons in those drawers. Standing up in between those drawer units and the stack of tupperware, are cutting mats and my sticky mats for my cricut and some templates. To the left of the drawers are two other drawer units that hold larger items. I have lots of stamps in those. I think all the drawers are filled with stamps. Above the first set of drawers you can see my cricut cartridges.

Okay now moving from the center position to the right on my desk is this wooden shelving unit that holds most of my ink pads. It's perfect for the SU ink pads. I also have kaleidasopes pads and marvy pads and other various pads in it. It's at a slight angle on my desk so it aims toward me and not flush against the wall. Sitting on this wooden shelf are glass jars. Yep, I recycle ragu jars for ribbon! LOL Hey whatever works, right?


To the left of the ragu jars are smaller glass jars that used to hold prima flowers and they now hold ribbon.


Here's a close up of the smaller jars. Above that, hanging on the wall, is a long hook sticking out. That holds more ribbon spools.

This is my fancy heat gun holder! LOL. Like it? LOL Hanging above that fancy holder is a canvas thing with clear pockets. I have a ton of stuff in it. What you can see in this picture are diamond glaze bottles, my Bind It All corner rounder, stamp cleaner, some paint (I dont' know why those are in there) LOL, and some stamps.


Wanna see more? LOL This is just another picture of my multitude of drawers! LOL. I can't seem to have enough of them!


This is to the left of my chair sticking out from my large desk at a right angle. And guess what it is? More drawers! Only bigger ones! LOL. This one I got at Staples and it's really sturdy. I have my cuttlebug and bind it all on it. I used to have my computer printer on it. To the left is another drawer unit. That one is on wheels! Woohoo...mobile drawers! LOL The stuff in these drawers are things that I use alot so they are right next to me.


It's only appropriate that my two bugs be next to each other! LOL. With them on different surfaces, they aren't taking up real estate on my work surface in front of me.


Okay now I am taking you back to the other side of me. This is on the right of my chair. This metal rack stands right next to that canvas organizer you saw earlier. This has a bunch of my SU sets on it. And above them are a few shelves of paper.


Not paper that I use a lot. Just there for future use.

Okay, that's it for now. Tomorrow, I will show you the OTHER side of my room.......yes, more stuff! LOL You're thinking to yourself...........she has too much stuff! LOL Maybe some of you are saying, "that's all she has?........" LOL. How many of you are saying that? I wanna know! LOL Well, notice, I haven't shown you my punches or my computer desk......(which has more stuff on it). LOL

Thanks for stopping by! See you soon!
Monday, September 1, 2008

No Calorie Desserts!!! Part 2

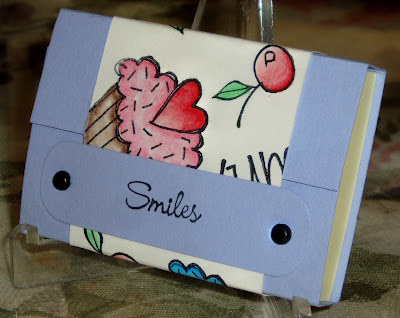
I thought I would put this project in it's own post since I was sharing so many photos of it. I just love how the colors turned out in these pictures. That doesn't happen very often! LOL This is a post it note holder. It was a project we did in the class on Saturday. Very simple to make. It is only two pieces of paper: blue and white. The blue is the base and also the little bar that goes across the front. It's held in place with two little black brads. The word smiles is from a Hero Arts set. I just tried to find it online but I can't find it on Addicted to Rubber Stamps. I will look some more tomorrow and post it. Sorry! I used my Prismacolor watercolor pencils to color it in and blended with my dove blender.
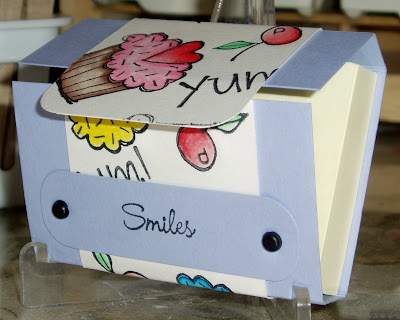
This holder is for a 2x3" post it note. I used double sided tape from Scotch to secure it.
Thanks for stopping by!! Any comments or questions are welcome!

No Calorie Desserts!!!

Is there such a thing? Well, there is if you use paper to make them! This was a class I did on Saturday. I hadn't left samples for this class so the people taking the class had no idea what I had up my sleeve. LOL. This cupcake card is done using Hero Arts stamps. I have the clear acrylic set that has several stamps. You can find it here. I have used this set so much!! I love it!
I used watercolor pencils from Prismacolor. And used SU blender pens to, well blend of course. :) I used Marvy scallop circle and oval punches for the cupcake and the sentiment. The paper is very heavy cardstock and has lots of fun colors and sparkle to it. I found it at Michaels.


The ice cream cone is from Denami Designs. This is a magnetic bookmark. I used business card magnets that I cut in half. I used chalk ink to distress the edges of all the paper, except the black of course. LOL Again, I used Prismacolor watercolor pencils and my dove blender. I love this stamp.


Thanks for stopping by!

Popsicle Cards

Katie made a bunch of popsicle cards last weekend. She had a lot of fun doing these. I stamped and colored and she assembled. We love how they turned out. These are for an upcoming craft fair we are doing together.

These first images are from Denami Designs. You can find their stamps here. I like the lemon
stamp because it's so versatile. It can be a lemon, lime or orange. Dont' have to buy three different fruit! LOL. These all have glitter on them which really jazzes up the card. I take that back, the cherries might not have glitter. All the images are stamped on white cs, colored with markers or pencils, glittered, dried and then cut out. Then they are mounted onto a coordinating piece of cs before adhered to the card front. The cherries were just punched out with a circle punch.

These next two cards have SU images. I love that watermelon; it's so cute! That one was stamped on red cardstock with black ink. Then also stamped on green cs in black ink. Then the rind on the green cs was cut off and adhered to the red watermelong, covering up the red rind. I liked it better this way than coloring it with red and green markers or pencils. Much brighter and more vivid. More work but nicer looking. :)
Katie is new to paper crafts, well relatively new and I had to convince her that diamond glaze would look awesome on the apples. Was I right? LOL. She didn't want me to do it. She also didn't want me to use the Liquid Pearls on the leaves either! LOL. But in the end she agreed. This one is my favorite. The apples are so shiny! These cards are so easy and fun to make.
Thanks for stopping by! What do you think? Think you'll make some too? :)