
Sunday, November 30, 2008
Glue Glider.....gotta have it!
Hi everyone! Happy Sunday to you......anybody out there still shopping? :) I have to share something totally cool with you that I just ordered.....it's called the Glue Glider and I found it at Joan's Gardens. It's like the ATG tape gun only much much smaller! LIke 1/2 the size and 1/2 the weight!!!! You must go look at it. She is having a buy one get one free sale until tomorrow!! She is offering it for 12.99. So you get TWO gliders for 12.99 plus shipping. The refills are 7.99 right now. This is a fraction of what the ATG costs! Sharon and Jerri both have it. If you click on their names it will take you to their testimonials. I can't wait to get mine. I have been wanting an ATG gun ever since I saw it demonstrated on Chic N' Scratch! So I am so excited. Just had to share!! Have a wonderful Sunday!
Thursday, November 27, 2008
Hot-linking....And a journal jar...
Hey all! Hope you all had a fun time shopping today! (if you went out). I was out briefly this morning and it wasn't too bad where I went. I didn't buy much, just some fleece to make one blanket! But I didn't try to brave the malls or the huge "box stores" as they call them in Vermont. When we moved here and heard that term we were like, "what are box stores???" Well people here refer to Best Buy, Staples, Toys R Us, Circuit City, Bath and Body Works as "box stores." I am not sure why....maybe it's because they are all shaped like big boxes!! I had never heard them called that before we moved here! LOL Thought that was funny.
So there's been A LOT of posting recently about "hot-linking." Have you heard of this? Here and here and here and here are some posts on the subject. Julie Ebersole and Kristina Werner have valuable information on their blogs. Those are the links I just provided. Please check them out. I wasn't aware of it....
So on to my project! I am so happy with how this Journal Jar turned out! This one will be for my daughter's teacher (1st grade). I absolutely LOVE this idea. I hadn't seen one before and it's easy, fast, inexpensive, and super cute! Here is the jar I saw that inspired me to make my own. I just love Nicole's blog! So many wonderful creations!
This glass jar came from Michaels. It is approximately 4 inches tall and the top is approximately 4 inches in diameter. I used a combination of my Cricut Mini Monograms Cartridge, my purple Marvy Scallop Circle Punch, regular circle punches, and my Cuttlebug Scallop Circle Dies to make all the layers. The ribbon came from MIchaels as well. It has a satin feel to it. The little strips of paper inside the jar are individual questions that you or an interviewer might ask a teacher. They were made using my computer and printer. I can email you my list if you are interested in making one of your own. I used the list Nicole provided but I also added two more pages of questions that I found on the internet when I googled "questions to ask a teacher." First I cut them out into strips and then I curled them with my bone folder, just like curling ribbon! Instead of using a butter knife or scissors, I used my bone folder because I was afraid of tearing the paper.
The little strips of paper inside the jar are individual questions that you or an interviewer might ask a teacher. They were made using my computer and printer. I can email you my list if you are interested in making one of your own. I used the list Nicole provided but I also added two more pages of questions that I found on the internet when I googled "questions to ask a teacher." First I cut them out into strips and then I curled them with my bone folder, just like curling ribbon! Instead of using a butter knife or scissors, I used my bone folder because I was afraid of tearing the paper. The top was made with my purple Marvy Scallop Circle Punch and my Cricut Mini Monograms Cartridge. I inked the edges of the scallops using a makeup sponge and Close to Cocoa ink. The apple image is stamped using VersaColor black ink and then embossed with Clear Detail Embossing Powder. I then colored the apples with my Prismacolor Markers. I added a little white from a gel pen on the highlight of the apple. The sentiment is from Hero Arts. It is one long sentence but I wanted to break it up into two lines so I used my Stampa-ma-jig for placement. I decided to use this sentiment since the journal jar is meant to be used on a daily basis, and hopefully the questions in the jar will help the teacher document her career over the years.
  The small medallion on the front of the jar was made using my Cricut (same cartridge), my Cuttlebug Scallop Circle Dies, and regular circle punches. There are some dimensionals in between two of the layers. I love that look!
The sentiment is from Hero Arts. It is one long sentence but I wanted to break it up into two lines so I used my Stampa-ma-jig for placement. I decided to use this sentiment since the journal jar is meant to be used on a daily basis, and hopefully the questions in the jar will help the teacher document her career over the years. The small medallion on the front of the jar was made using my Cricut (same cartridge), my Cuttlebug Scallop Circle Dies, and regular circle punches. There are some dimensionals in between two of the layers. I love that look!If you'd like to make one for your child's teacher, and wish to use the questions I cut out, please let me know and I will email you the word document. It's a really cool project and one that I really enjoyed making! If you have any questions please let me know! Thanks for stopping by!!
Some pics...and new music
You like the new music? I love Christmas music and today after all of our traditions, I decided to come down and make a new playlist with just holiday music. I could sit here and listen to it all day! Of course if you don't like it you can hit stop on the player. ;)
Today was a great day! We ate like piggies and then played some family games and then called the family down in Florida and the phone was passed around the room here and down there. We even got some snow flurries while we sat an ate! In case you didn't know; I LOVE SNOW! LOL You'll be seeing lots of snow pictures this winter!
I tried to create something tonight but I was having too much fun listening to the Christmas music! I did make up these journal jars the other night for my younger kids' teachers this year. I saw the idea on Nicole Heady's blog. I thought it was an awesome idea!! I found two small jars and two baskets at Michaels and I got two sketch books from Ben Franklin. (Michaels carries the same kind.) I will also add a pen, a small datebook that I found at Michaels, a bookmark and maybe some notecards for each teacher. This is the first year actually that I will make something for their teachers. The teachers always send a note home before Christmas asking parents not to buy gifts for them, but when I saw these jars I couldn't resist making them. I have printed out the journaling questions and cut them into strips and have curled them. I used the list found on Nicole's blog but I also found other questions on the internet; questions that teachers would be asked during a job interview. My little jars are crammed with curled up strips of paper! LOL I had to smoosh them down a little as I filled the jars so that all of them would fit. LOL. I haven't decorated the outside of the jars yet, that's why I haven't posted pictures. The jars are cute though without decoration! :) I will post them this weekend....
Anyway, I just have a couple of pictures to share with you. First is my Jazz.....he hates his picture being taken. I opened my camera in another room because as soon as he hears the lens pop out (a little mechanical noise) he goes running and hides wherever he can! So I snuck up on him! He looked up at me and then I snapped the picture. Well he looked away to get up off the floor and that's the picture I ended up with! Crazy dog! Yes that is my vacuum and my shampooer behind him! LOL
Then there's Hershey. He is so photogenic and loves his picture being taken. He looked at me before he started to walk away and when he saw the camera in front of my face, he sat down for me! LOL. I wish Jazz would do this!!!! Little stinker! Hershey is a Shitzu-Poodle mix. He used to be very dark brown like chocolate; hence the name. But then he lightened up and now he looks like caramel! Then there's Jared carving the turkey...........look how interested our son looks! LOL
 And last but not least, are the pies! I tried to take a picture before Katie cut into them, but I missed my opportunity! The one on the left is a 4-berry pie! YUM!! Looks sloppy but it's oh so good! LOL.
 Anyway, I hope you all had a wonderful Thanksgiving! Anyone getting up at o-dark thirty to go shopping???? I am taking Katie early, like 7:30, to Joann's. She wants to get some big thread holder display thingie. That's as early as I am getting out the door! So I will close for now.....sorry this is so long! LOL. Have a great night; happy shopping and stamping!
Then there's Jared carving the turkey...........look how interested our son looks! LOLAnd last but not least, are the pies! I tried to take a picture before Katie cut into them, but I missed my opportunity! The one on the left is a 4-berry pie! YUM!! Looks sloppy but it's oh so good! LOL.Anyway, I hope you all had a wonderful Thanksgiving! Anyone getting up at o-dark thirty to go shopping???? I am taking Katie early, like 7:30, to Joann's. She wants to get some big thread holder display thingie. That's as early as I am getting out the door! So I will close for now.....sorry this is so long! LOL. Have a great night; happy shopping and stamping! Happy Thanksgiving!!!
Good morning! Happy Thanksgiving to you all! I can't believe today is here already; seems like yesterday I was eating turkey! LOL. I have had my turkey in the fridge for 5 days now, and this morning, I pulled it out and he's still somewhat frozen! I couldn't get the neck out and the gizzards out of the cavity. So now he sits in water.........and we wait......lol
Meanwhile I am going through all my blog updates. I have signed up for so many newsletters that it takes me a good 2 hours to view them all! That's okay though, I love it! I also had to check out the SU sale that's been so excitedly talked about! I plan on ordering some things but I also want to take advantage of the sale at JustRite stamps that I shared with you earlier. It's so hard to pick a starter set though; I love them all!
This year I have much to be thankful for. First, my family. We are healthy, we have a roof over our head, we have food on the table and we have each other! After two major surgeries in the family this year, we are grateful that we are all healthy now. In case you are new to my blog, I had emergency surgery at the end of March to remove my gall bladder. And my 9 year old son had emergency surgery just a few weeks later to remove his appendix! Not a fun spring this year! But we are all recovered and back to normal; whatever that might be! LOL.
I am also grateful that we both have jobs! So many people we know lost their jobs recently and I can only imagine what that must feel like just before the holidays!
Of course I am grateful for all the little things in my life and my beloved dogs, but I am so lucky to have the relationships that have with my family and close friends. I have made a few very close friends this year and it's been wonderful. And I feel this year, my family is a much tighter unit; it's awesome. So many of our friends have "lost everything"; their homes, their wives or husbands, children, pets, jobs..... We feel so lucky to have each other.
My thoughts are with those of you who have lost something close to you this year; whether that be a loved one, a pet, or an income. This time of year makes us think of those things much more and it's extremely hard during the holidays. I miss my parents all the time but the holidays are hard. I just count my blessings, which are many, and focus on the positive things that we have encountered this year. I always say to myself when I am feeling sorry for myself, "someone out there has it worse than me....." And it's true! So I count my blessings and thank GOD for all those things that I might take for granted!
Happy Thanksgiving everyone!! Have a happy, healthy, and safe holiday!!!! Thanks for stopping by today!
Sunday, November 23, 2008
Christmas Planner.....Just a Peek!
Hi all! Hope you're having a great Sunday! Today I've been working on my Christmas Planner. I'm just showing you a little of it since I don't have it done. lol. The book itself is a sketch journal from the art section at Michaels or Ben Franklin. It measures about 8" x 6". It has a hard faux leather cover and is spiral bound. I believe I paid about 6 dollars for it. The paper inside isn't lined.
I took both covers off before I did anything to the front. I wanted to cover all of the black faux leather stuff. First I laid the cover down on the cardstock and with a pencil marked the holes. Then I trimmed the cardstock to allow for 1 inch excess all the way around. I adhered the green cardstock with Perfect Paper Adhesive and a 1 inch foam brush. I allowed this to dry and then started the image. Once it was dry, I turned the cover over so I could see the holes and then using my crop o dile, I re-punched the holes into the green cardstock. I layered the cover with old olive and then the pattern paper from KaiserScrapbook. And finally my stamped image.
The inside of the front cover is also adhered with PPA. I cut this paper to allow for 1/8" border all the way around so the green cardstock would show. I again covered up the holes with the paper so when it was dry, I flipped the cover over so I could see the holes again (from the front side) and then re-punched the holes. Then I put the covers back on the book.
This little snowman is from Inkadinkado as well. I stamped him, embossed him, and colored him in with my Prismacolor markers. I added the light blue ink to the edges as well.
You can see in the picture above a calendar peeking from the right side. I made that up in my computer. (the grid and month part) and then I stamped all the numbers. I stamped some images to coordinate with the month of November and colored them in the same as the snowman. I wish I had smaller numbers to use but I didn't. And I didn't feel like typing them in when I made the month template; I don't know why.... But I'm not showing you the calendar part because I'm not done with it. LOL I will show you more of the book as I complete more of it. :) So far, I like how it's turning out and it's fun to make.
Thanks for stopping by! Check in again to see more of my Christmas Planner!
The stamp I used on the cover is from Inkadinkado. It is SO cute. I just love that fat little bird! The bird is really what made me buy the stamp. LOL I stamped it with VersaColor Black and then embossed it with clear detail EP. Then I colored it with my Prismacolor Markers and shaded the edges with a sponge and light blue ink from one of my Marvy Matchable pads. I layered with old olive cardstock, and patterned paper from KaiserScrapbook. I used my new Martha Stewart border punch along the bottom. The ribbon is from Michaels. The whole piece is adhered with square pop dots.
I took both covers off before I did anything to the front. I wanted to cover all of the black faux leather stuff. First I laid the cover down on the cardstock and with a pencil marked the holes. Then I trimmed the cardstock to allow for 1 inch excess all the way around. I adhered the green cardstock with Perfect Paper Adhesive and a 1 inch foam brush. I allowed this to dry and then started the image. Once it was dry, I turned the cover over so I could see the holes and then using my crop o dile, I re-punched the holes into the green cardstock. I layered the cover with old olive and then the pattern paper from KaiserScrapbook. And finally my stamped image.
The inside of the front cover is also adhered with PPA. I cut this paper to allow for 1/8" border all the way around so the green cardstock would show. I again covered up the holes with the paper so when it was dry, I flipped the cover over so I could see the holes again (from the front side) and then re-punched the holes. Then I put the covers back on the book.
This little snowman is from Inkadinkado as well. I stamped him, embossed him, and colored him in with my Prismacolor markers. I added the light blue ink to the edges as well.
You can see in the picture above a calendar peeking from the right side. I made that up in my computer. (the grid and month part) and then I stamped all the numbers. I stamped some images to coordinate with the month of November and colored them in the same as the snowman. I wish I had smaller numbers to use but I didn't. And I didn't feel like typing them in when I made the month template; I don't know why.... But I'm not showing you the calendar part because I'm not done with it. LOL I will show you more of the book as I complete more of it. :) So far, I like how it's turning out and it's fun to make.
Thanks for stopping by! Check in again to see more of my Christmas Planner!
Saturday, November 22, 2008
Happy Saturday! A few things to share...
Hi All! Hope you are all having a nice Saturday so far! I have been cleaning this morning because Lauren has a friend coming over from school at 1 o'clock. But I am taking a brief break so I can share a few things....
First if you don't know about JustRite stamps, or you do and you haven't purchased any yet, now is the time to do it! They are having a buy one get one free sale until Nov. 30th. Click here and check it out! I have been dying to get some of these stamps!
Next, did you know that the Cuttlebug and the Stampin Up's Top Note Die can be used together??? I didn't know that, and I asked Angie over at Chic N Scratch and she wasn't positive so I did a search on SCS and I found this thread! I want one of those dies but I didn't want to buy the Sizzix machine! I think I might try my friend's first in my CB and see how it comes out.
Next, Krissy at Hanna Stamps lost her dad this week and her story really touched me since I lost both my parents and I sent her an email. Read her story here and I'm sure she'd appreciate some more cyber hugs....
And I know there was something else I wanted to share but now I can't remember. LOL. I will be back later and I am going to try to make something when I have a chance today! Thanks for checking in! See you soon!
Tuesday, November 18, 2008
I re-posted a tutorial
I guys! I wanted to let you know that I re-posted the tutorial for the Countdown to Christmas Box. Click here to view it, if you would like! :) I had offered it as a class last month so I took it off temporarily but since that time has passed I put it back on.
Thanks for stopping by! Have a wonderful night!
Thanks for stopping by! Have a wonderful night!
Monday, November 17, 2008
Making video tutorials...
Good Monday night to you! Hope you all had a great weekend! I was sick with a nasty cold all weekend, but I did manage to make a video tutorial for the recipe portfolio!!! Woohoo!! It has pictures and subtitles and cool effects and credits...........Do you see it in the list under tutorials?????? NO! You know why???? Because I can't upload the stinkin' thing! OMG. I don't know about you but when I can't figure something out on my computer, I get really frustrated!! I usually will keep at it for hours on end until I figure it out. Well not this time! LOL. The video needs to be converted to a different type of file in order to upload to veoh or you tube, so I downloaded a program that is supposed to convert files like that. Well, the program that I downloaded won't import the type of file that the video is so that I can convert it!!!!!!!!!! How stupid is that?? So in order to convert the movie so veoh accepts it, I have to convert it to a different file so the conversion program will convert it! That doesn't make any sense! So I give up unless someone out there can explain to me how to do it! LOL Anybody know? :)
So I am going to type out a tutorial right now and post it on another post. So here I go..........off to type it up... lol
So I am going to type out a tutorial right now and post it on another post. So here I go..........off to type it up... lol
Saturday, November 15, 2008
I haven't forgotten...
Hi everyone! Sorry about not posting this week. I was so busy at work and I am so tired when I get home. And I have caught a nasty cold! I feel awful! But it doesn't take much energy to sit at my computer with my feet on my desk and my keyboard in my lap! LOL. I am planning to make a video today showing you how to make the recipe portfolio. So check back later for that!
Are you getting any Christmas shopping done yet? I have been doing most of my shopping online this year and am almost done. This is the first time since I've had kids that I have started this early! But I am determined to stay away from the mall this year! LOL. I have only had to make one trip there so far.
I plan on getting myself some things as well ! LOL I am in love with JustRite stamps and want to get a starter set soon. And I want some more Prismacolor Markers. What are you dying to have? I"d love to get more ideas on things I need! ROFL!!
Thanks for checking in!!! Have a wonderful day! Leave me a comment with your wish list; I'd love to see it!
Tuesday, November 11, 2008
Webcam and Microphone all set up!
Hi!!! I am so excited to tell you that I have my webcam and microphone set up!!! Yayyyy!!! I can't wait to do my first tutorial!!! I think the first one will be the recipe portfolio. I know a couple of you have asked for it. So that will be coming. I might be able to get back online and do it after dinner.
Hey I added the logo "stamping top 50" to my blog and I am excited to see that right now it's at 103!! I couldn't believe it when I saw it the first time. I thought it had to be mistaken. LOL. So thank you for visiting me and making that possible!
Thanks for stopping by and have a wonderful night!!!!! Talk to you soon!
Monday, November 10, 2008
Hi All! Friend coming over....
Just a quick note to say hey! I have a friend coming over to "play" tonight! So excited! We went shopping earlier today so now we have to try out our new stuff! LOL. I will post whatever it is we make.
I did dig out my webcam today and I am going to figure out how to do some video tutorials. I am off work tomorrow and I have to go find a microphone, cuz my puter doesn't have one built in and then try it out! I also have a video camera but I need another cord I think to make that one transfer over to my computer. Anybody have any clue about that? It's an older camera so it doesn't have a USB port on it. It has a S-Video connection so somehow I can get movies onto my computer with that. I know I've done it before about 4 years ago but one of my dogs chewed through that cord a few years back! Stinkin' dog! LOL
Anyway, check back later tonight or tomorrow morning and I will have something posted. Thanks for stopping by! Have a great night!
Saturday, November 8, 2008
My Recipe Portfolio is done! Look-see!!
Having a nice Saturday evening? It's been dreary here today. But I did finish my project!! Yay!! Like I said in my earlier post today, Lauren Meader made this and I saw it on her blog recently. I absolutely loved it and had to figure out how to make it. She said she was going to post directions but I am impatient! LOL So here's mine! The base of the card is cardstock (SU old olive) and the decorative border is double sided paper from KaiserScrapbook, made in Australia. I found it at my local craft store. I punched the border with a corner punch with the guard removed. Underneath the patterned paper is a small piece of vanilla cardstock punched the same way. I felt that the vanilla color made the pattern paper "pop" off the green. The words holiday recipes was stamped using my Stamp-a-majig and individual letters. I searched my stamp stash first for words and didn't like my options. The bow is like a velvety feeling cord. You can see from the side view below that I have eyelets set in the cardstock with the cord pulled through. They are little holly leaf eyelets.
 My portfolio was made with Christmas baking in mind. I don't know about you but I love the holidays and all the baking I get to do! :) So each category stands for something you'd bake for Christmas; cookies, cakes, breads, pies, bars & squares, and breakfast & brunch. There are 6 pockets and each pocket holds 5 recipe cards. I struggled with ideas for making the cards. I tried different stamps I have and didn't like any of the options...
 So instead of going and buying more stamps, which I could have done, (hahaha) I chose to use my computer. I used the Gigi font and just made a text box with a dotted border and then typed in what I wanted on the card. I printed several pages before I got the size right. Then I made a dotted circle for the titles. They are 1" in diameter and then I used my various sized circle punches for the layers.
 The pockets are decorative paper matching the one I used on the cover. The strip across the top is paper, not ribbon.
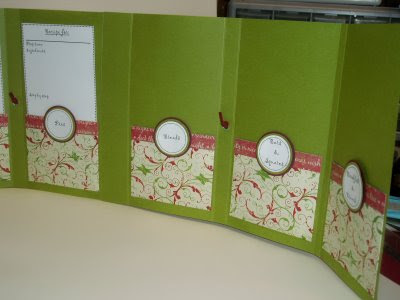
The base of the card is cardstock (SU old olive) and the decorative border is double sided paper from KaiserScrapbook, made in Australia. I found it at my local craft store. I punched the border with a corner punch with the guard removed. Underneath the patterned paper is a small piece of vanilla cardstock punched the same way. I felt that the vanilla color made the pattern paper "pop" off the green. The words holiday recipes was stamped using my Stamp-a-majig and individual letters. I searched my stamp stash first for words and didn't like my options. The bow is like a velvety feeling cord. You can see from the side view below that I have eyelets set in the cardstock with the cord pulled through. They are little holly leaf eyelets.My portfolio was made with Christmas baking in mind. I don't know about you but I love the holidays and all the baking I get to do! :) So each category stands for something you'd bake for Christmas; cookies, cakes, breads, pies, bars & squares, and breakfast & brunch. There are 6 pockets and each pocket holds 5 recipe cards. I struggled with ideas for making the cards. I tried different stamps I have and didn't like any of the options...So instead of going and buying more stamps, which I could have done, (hahaha) I chose to use my computer. I used the Gigi font and just made a text box with a dotted border and then typed in what I wanted on the card. I printed several pages before I got the size right. Then I made a dotted circle for the titles. They are 1" in diameter and then I used my various sized circle punches for the layers.The pockets are decorative paper matching the one I used on the cover. The strip across the top is paper, not ribbon.
Here's what the pockets look like with no cards in them. (picture above) And in the picture below, you see what it looks like partially folded.
And below you see it completely unfolded. I really liked this project. Fun to make and like Lauren said they would make great gifts! Thanks for looking!! What do you think?? 
Recipe Portfolio
Happy Saturday~ Recently I saw a recipe holder that Lauren Meader made and she called it her Recipe Wrap. It is awesome!! I love her blog! And I love her creations!! Check out her other "stuff" here. Well...... she is going to post instructions soon but I had to figure out how to do it myself since I am impatient and I couldn't wait to make one! LOL. So I have been working on it during the week and am almost done with it. (I'm not claiming the design as my own; I just figured out how to make one by looking at her pictures) It's been a fun process trying to figure out the size and measurements. And it's been a lot of trial and error! I will be finishing it and posting my portfolio this weekend and can't wait to show you! Hope you're having a great weekend so far!! Thanks for stopping by!
Saturday, November 1, 2008
Autumn Moo Cow
Happy Saturday! Hope you are all having a wonderful weekend! I wanted to share a card that I started during the week and just finished today. That's what happens when there aren't enough hours in a day! Things get set aside all the time around here! LOL I started my card with the cow. He is from Stampabilities. I stamped him on whisper white cardstock with Versacolor black ink. I then heat embossed it with clear detail embossing powder and my heat gun. I then colored him with my new Prismacolor Markers. I used Light Umber, Sand, Golden Rod, and Peach. Once he was colored in, I heat embossed him with the clear detail EP again making sure that I didn't go outside the lines with my Versamark Marker. Just to be sure he was completely covered I did this step twice. Then I got out my Marvy Matchables ink pads and my brayer and sponges and went to town. I used Salvia Blue, Light Blue, Prussian Blue, Dark Brown, Light Green, Turquoise, and Green. I started with the lightest blue and my brayer and progressed to the darkest blue using the brayered sky technique. Then I did the grass using the same technique. I used a torn piece of paper and a sponge to do the grassy hills. The grass is a stamp from Impress Rubber Stamps. Once I was happy with how this looked then I punched the corners with my ticket corner punch from SU and mounted it on creamy caramel cardstock from SU. I distressed the edges with my distressing tool from making memories. Then I mounted that to really rust cardstock from SU and distressed the edges again. I added copper brads to each corner.
  Then I moved on to my tree. The tree is from Hero Arts. I stamped it with the versacolor black inkpad and heat embossed it with clear detail EP. Then I used my Prismacolor markers to color in the trunk and leaves. I used Poppy Red, True Green, Spanish Orange, LIght Umber, Sand, Crimson Red, Dark Green and Golden Rod. Once it was completely colored in, I used my versmark marker and heat embossed the whole thing with clear detail EP. Once I was done with that, I grabbed my brayer again and marvy matchables ink pads in Salvia Blue, Light Blue, and Prussian Blue to do the sky. The grass was done with Light green, Turquoise, and Green. I used the torn paper again to do the grassy hills. I used a green staedtler marker to hand draw some grass here and there. I mounted the tree to the same cardstock colors as the cow, punched the corners and added copper brads. Then i grabbed another piece of white cardstock and stamped another tree. I did the same process to color it as before but this time I picked a section I liked and cut it out. I added this to the card between the tree panel and the cow panel. I thought this would tie the two elements together. Once I put these three pieces together, I adhered the entire thing to a large piece of creamy caramel that I embossed in my Cuttlebug. After that was put together, I attached it to my card base which is chocolate.
 Here is the finished card! I like how it turned out. Very colorful and vibrant in person. What do you think? Thanks for stopping by! If you have any questions please let me know!
I started my card with the cow. He is from Stampabilities. I stamped him on whisper white cardstock with Versacolor black ink. I then heat embossed it with clear detail embossing powder and my heat gun. I then colored him with my new Prismacolor Markers. I used Light Umber, Sand, Golden Rod, and Peach. Once he was colored in, I heat embossed him with the clear detail EP again making sure that I didn't go outside the lines with my Versamark Marker. Just to be sure he was completely covered I did this step twice. Then I got out my Marvy Matchables ink pads and my brayer and sponges and went to town. I used Salvia Blue, Light Blue, Prussian Blue, Dark Brown, Light Green, Turquoise, and Green. I started with the lightest blue and my brayer and progressed to the darkest blue using the brayered sky technique. Then I did the grass using the same technique. I used a torn piece of paper and a sponge to do the grassy hills. The grass is a stamp from Impress Rubber Stamps. Once I was happy with how this looked then I punched the corners with my ticket corner punch from SU and mounted it on creamy caramel cardstock from SU. I distressed the edges with my distressing tool from making memories. Then I mounted that to really rust cardstock from SU and distressed the edges again. I added copper brads to each corner. Then I moved on to my tree. The tree is from Hero Arts. I stamped it with the versacolor black inkpad and heat embossed it with clear detail EP. Then I used my Prismacolor markers to color in the trunk and leaves. I used Poppy Red, True Green, Spanish Orange, LIght Umber, Sand, Crimson Red, Dark Green and Golden Rod. Once it was completely colored in, I used my versmark marker and heat embossed the whole thing with clear detail EP. Once I was done with that, I grabbed my brayer again and marvy matchables ink pads in Salvia Blue, Light Blue, and Prussian Blue to do the sky. The grass was done with Light green, Turquoise, and Green. I used the torn paper again to do the grassy hills. I used a green staedtler marker to hand draw some grass here and there. I mounted the tree to the same cardstock colors as the cow, punched the corners and added copper brads. Then i grabbed another piece of white cardstock and stamped another tree. I did the same process to color it as before but this time I picked a section I liked and cut it out. I added this to the card between the tree panel and the cow panel. I thought this would tie the two elements together. Once I put these three pieces together, I adhered the entire thing to a large piece of creamy caramel that I embossed in my Cuttlebug. After that was put together, I attached it to my card base which is chocolate.Here is the finished card! I like how it turned out. Very colorful and vibrant in person. What do you think? Thanks for stopping by! If you have any questions please let me know!
Subscribe to:
Posts (Atom)