Hi everyone! Had a fun night of trick or treating with the kids and my friend and her baby! We live in a great development with a 1 mile circle loop and a couple of side streets with cul-de-sacs. We live in one of the only true "neighborhoods" where the houses aren't on large lots or acres. Most of the houses have their land or acreage in the rear of the house with maybe 100 yards or so in between each house. So it makes for great trick or treating and the kids can run from house to house. With that being said.........just about all the residents with little kids in my little town bring their kids to our neighborhood because they either live on farms with no neighbors or they live where the neighbors are like a block away! LOL. So we usually get about 250+ kids running through here. People park their cars at one of the two entrances and then walk around the mile loop. You usually see about 20-30 cars at each entrance. Sometimes you see trucks pulling flatbed trailers with about 20 kids riding in it and the truck just drives through the neighborhood stopping at each house and the kids all jump off and run to everyone's house! I remember the first year we lived here (coming from apartment living in California where we had no trick or treaters) I just about died when I saw the first truck load of kids running down my driveway! LOL What a riot that was! We buy about 10 bags of candy each year and we always run out before all the kids have left our neighborhood! It seems like every year the number of kids coming through gets higher and higher! LOL. When the weather is bad or cold, it doesn't stop the trick or treaters! The parents just drive their cars or mini vans and in front of every house, you see the car door fly open and kids run out, get candy, and get back in the car! It's pretty funny. I've never seen so many kids on one street! What usually takes about 20 minutes to walk around the block, Halloween takes more than an hour.
Since we've accumulated 4 dogs over the years who are barkers (and our biggest is the watchdog), we lock them in my office in the basement and turn on music really loud so they can't hear the kids or the knocking on the door constantly. It's so funny. When we let them out, they run around the house all crazy and then run around the yard with their noses to the ground! It really is a fun night, to say the least. Jared was an army man, wearing daddy's uniform and his bullet proof vest which weighs a ton to a little kid! But he wore it the entire time! I dragged the wagon along with us in case he wanted to take it off halfway around the block. Lauren was a bat. A nice fuzzy bat with a pink belly and purple face on the hood. So cute.
Anyway just wanted to share our night and wish you all a safe and Happy Halloween! Hope you are all having a great time and enjoying all the costumes! We saw some pretty crazy ones! LOL
Thanks for stopping by! I will have some cards and projects to post this weekend!
Lots of hugs,
Rachel

Friday, October 31, 2008
Monday, October 27, 2008
Tutorial for Snowman Card Box
Happy Monday Y'all! Had some errands to run and totally forgot that I was supposed to post the directions to the snowman box! I am so sorry! DUH! LOL. There are LOTS of pictures in this tutorial so that hopefully it makes sense. I don't have my webcam set up yet to do videos so I have to take a ton of pictures and catch each step. Now just to re-iterate, the original box for 6x3" cards came from Kiyomi and I posted her link in my first post here. You can see her box and her video. The box I made is for standard size cards but I follow her same basic instructions on how to put the box together. Thanks Kiyomi for your wonderful ideas!!! ;) Okay so on to the tutorial....
 Now slide your thumb and forefinger down the box along the strip and pinch the strip where the edge of the box is, as shown below.
 This will make a nice crease right in the right spot. Now turn the box slightly so that you can crease the next edge, as shown below.
 Set this piece aside and do the same thing to the other strip of cardstock.
 Hope you enjoyed this tutorial! If you have any questions, please let me know. Thanks so much for stopping by and have a wonderful night!
Cut a piece of 12x12 Cardstock to 7-3/4 x 12". Set the extra piece aside, you will use this later to make the belly band.
Using a Scor-Pal, line the short end of the cardstock against the left side of the Scor-Pal and score at 1". (If you don't have a Scor-Pal, use your method of choice to make the score marks). 5-1/2",
  6-1/2",
  and 11".
5-1/2", 6-1/2", and 11". FOR SCOR-PAL USERS: Turn the paper so the long side is against the left side of the Scor-Pal  and score at 1".
  Now slide the cardstock toward the right side 1/4". That would be the second line from the left side.
  Now score at 7".
and score at 1". Now slide the cardstock toward the right side 1/4". That would be the second line from the left side. Now score at 7". FOR NON SCOR-PAL USERS: Score at 1" and 6-3/4".
Now to make the cuts:
On the LONG side of the cardstock make 1 inch cuts on EACH score line only up to the perpendicular score line.  Do the same thing on the opposite long side. Make an additional angled cut at the left edge by trimming just a hair off,
 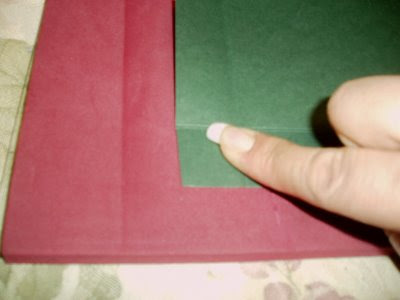 the 5-1/2" line,
  and the right edge.
  These slight cuts make assembly much cleaner and straighter.
Do the same thing on the opposite long side. Make an additional angled cut at the left edge by trimming just a hair off, the 5-1/2" line, and the right edge. These slight cuts make assembly much cleaner and straighter.Decide which side you want the top to be and make a small x on it.  On that same side, use your circle punch to make a half moon cut on the edge so that the box can easily open with your thumb.
On that same side, use your circle punch to make a half moon cut on the edge so that the box can easily open with your thumb. I used a 1" circle punch and you just slide your paper in halfway and punch.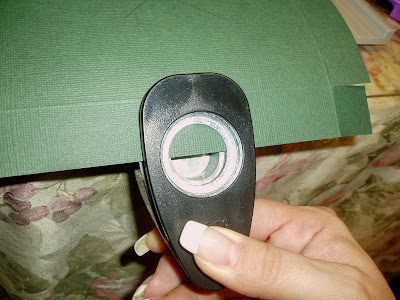
Next, attach your decorative piece of paper to the top. This piece should be cut to
4-1/4" x 5-1/2". (Not pictured)
Important: Now flip your paper over so the X is not visible and it's facing the table.
Fold up the "tabs" that your previous cuts just made. Flatten them against the cardstock when you fold them up.  This is where you place your adhesive (on the side facing up).
  I use double sided tape. It holds very well! I cover the entire tab with tape. Cover all 6 tabs and begin to assemble your box.
  I start with the bottom of the box, making sure to line up the top edges. Make sure your tabs are stuck inside the box so they are not visible. If you put your adhesive in the right spots your tabs can only get stuck on the inside anyway. LOL Below is the top of the box. I haven't added the decorative piece yet.
This is where you place your adhesive (on the side facing up). I use double sided tape. It holds very well! I cover the entire tab with tape. Cover all 6 tabs and begin to assemble your box. I start with the bottom of the box, making sure to line up the top edges. Make sure your tabs are stuck inside the box so they are not visible. If you put your adhesive in the right spots your tabs can only get stuck on the inside anyway. LOL Below is the top of the box. I haven't added the decorative piece yet.Now you can do the belly band. Cut the leftover piece of cardstock that you aside at the beginning. You need two pieces each cut to 2"x9". Hold one piece against the box with the short edge aligned with the top of the box.
Now slide your thumb and forefinger down the box along the strip and pinch the strip where the edge of the box is, as shown below.This will make a nice crease right in the right spot. Now turn the box slightly so that you can crease the next edge, as shown below.Set this piece aside and do the same thing to the other strip of cardstock. Once you have them both creased well, you need to attach them together. This is how they will stick together....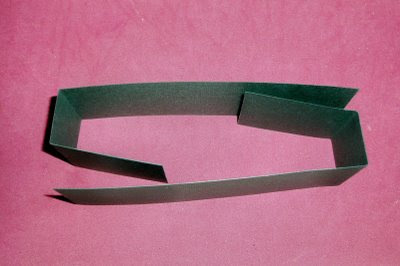 each short flap is attached to the INSIDE of each long flap. So that all you see on the outside of the box are long flaps. The short ends will be hidden. Place adhesive on the short sides as shown below.
each short flap is attached to the INSIDE of each long flap. So that all you see on the outside of the box are long flaps. The short ends will be hidden. Place adhesive on the short sides as shown below.When sticking the two strips together, take the edge of one LONG side and lay it down on the SHORT side of the other strip. Be sure to come just short of the first crease. Don't line the edge and crease up perfectly. You need about 1/16" of an inch space between the crease of one strip and the edge of the other strip, as shown below. My two strips are adjoined at the crease on the right and there is the slightest amount of space right there. This allows a little extra room in the band so that it slips on an off the box easily. Attach the other end the same way. 
And voila, you have a belly band and your completed box. Decorate as you wish! :) Hope you enjoyed this tutorial! If you have any questions, please let me know. Thanks so much for stopping by and have a wonderful night!Sunday, October 26, 2008
Stationery Box ~ Class
This class will be offered on November 30th from 1pm-3pm at Stamp On It in Essex Junction. Class fee is $25. You will leave with a completed box including everything that goes inside: a small address book, tags, notecards, standard cards, a decorated pen, and a lid that holds everything inside and the box closed! **NOTE**The colors used will be different than the box shown in these pictures. Please call 872-0877 to reserve your seat! 


Countdown to Christmas Box ~ Class
This class will be offered November 10th from 11am-1pm, at Stamp On It in Essex Junction. Class fee is $20. You will leave with a decorated wooden box with a complete set of numbers. Please call 872-0877 to reserve your seat!


**If you happened to notice that one of the letters is upside down, please be assured that this has been fixed.**
Saturday, October 25, 2008
Good Saturday Morning to You!
Well, as you might be able to tell, I made some color changes last night to my blog. Just the link colors, the text color, the title color.........that sort of thing. And put my blog name and description up at the top in the picture. I love changing things.......keeps it fun! Anyway, today I am going to our BIG fall craft fair in Essex Junction. Ohhh I can't wait. I love this time of year when craft fairs are going on almost every weekend. This fair usually has over 400 crafters and vendors. Lately though it's been smaller so I don't know what to expect this year. I will let you know! I can't wait to find some more dichroic (sp?) glass. I love to get the pendants and the earrings.
I found a blog last night that just blew me away. Not just for the beautiful cards and projects she makes but for the kind of person she is. She is a foster mom. She has grown children of her own and grandchildren and now she takes in newborns and infants who need loving environments. I read her latest story and it struck me because the parents of the babies are both in the military and are BOTH leaving for a year up to 14 months to serve their country. They chose Barb and her husband Bill to care for their children while they are gone; twin infants and a toddler! Read their story...it just blew me away. Their generous hearts really touched me..... Here is their story. Then read this link, and this one, and this one. It will describe the process of getting their house ready and tells a little about the family.
Have a wonderful weekend and enjoy the fall weather!
Monday, October 20, 2008
Pumpkins in the Night
Oh I have to say first that I love these new markers!!!!!!!! Super easy and fun and really awesome! LOL I only got to color the pumpkins for this card but that's okay. I need to practice with all the colors. I only used two colors, a yellow and an orange.


Supplies used:
Memories Dye Inkpad Black for swirls
Versacolor black to stamp the pumpkins and then emboss with clear detail EP
Marvy Matchables in Prussion Blue, LT. Blue, Salvia Blue,Turquoise, Green and Dark Brown.
Versamark Marker for pumpkins
Brads, brayer, corner punch for border, scissors, white gel pen, ticket corner punch.
I will post complete instructions tomorrow but wanted to share this with you all because I was so excited to use my markers! Have a great night!
Happy Monday! Prismacolor Markers
Hi guys! How was your weekend? I checked out a small craft fair with my oldest daughter (gearing her up to do it next year) and today (which is still my weekend) I went to Michaels. I had a cricut cartridge that I've been holding on to for a long time still unopened and I finally decided I was going to take it back. I knew that if/when I decided to use it, it could be months or even years from now! LOL So instead (since I didn't have my receipt) I picked myself up some Prismacolor markers!!!!! Woohoo! I can't wait to try them out! I had read Michelle Zindorf's question and answer page and almost at the bottom of the page, someone asked her why she used Prismacolor markers instead of Copic and then she provided a link to a video tutorial on how to use them. Along with her answer and watching the video I decided I would try Prisma instead. Here's Michelle's q&a and also the link to the tutorial. At the bottom of the Prismacolor page are 4 links to videos and you want to click on the 3rd one. I was convinced to try them out. I found a website last night who sold them for 1.99 each! Here is that link. If you purchase 24 or more markers they go down to 1.89 each! That's the cheapest I have seen them online. I know Michaels carries them for 3.99 each and so does Dick Blick online. If you know of another site who sells them this inexpensively, please leave me a note. Thanks!
So I am going to go color now! :) I will post some pics later! Thanks for stopping by!!
So I am going to go color now! :) I will post some pics later! Thanks for stopping by!!
Saturday, October 18, 2008
Card Boxes
I found this great template and tutorial at KiyomiKrafts, and thought I would make some myself. I love this template and I figured out how to adapt it to make different sizes! This box was made using her dimensions. This stamp is from Stampendous. I love Fluffles the Cat! He is so cute! He is colored with Staedler markers and blended with my dove blender. He is mounted on light blue cardstock and then adhered with dimensionals to the belly band. I added three buttons on the opposite end that match the colors of the designer paper. 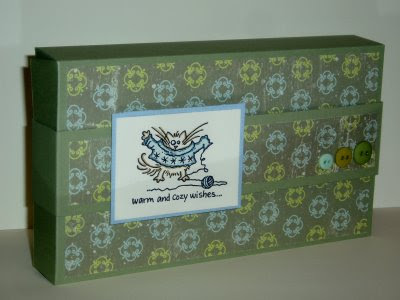

 And this is a box I came up with for standard sizse cards using the same basic tutorial. I don't know if someone else has already come up with these dimensions, so I apologize if I am stepping on anyone's toes! :) The snowman is from a Hero Arts acrylic set. I did a little bit of paper piecing with his hat and gloves.
 I am suffering with the flu right now. I thought I could sit here at my computer and catch up but I don't feel very well, so I am off to bed again! I will post dimensions to my box when I feel better! Thanks for stopping by! Have a great weekend.
And this is a box I came up with for standard sizse cards using the same basic tutorial. I don't know if someone else has already come up with these dimensions, so I apologize if I am stepping on anyone's toes! :) The snowman is from a Hero Arts acrylic set. I did a little bit of paper piecing with his hat and gloves. I am suffering with the flu right now. I thought I could sit here at my computer and catch up but I don't feel very well, so I am off to bed again! I will post dimensions to my box when I feel better! Thanks for stopping by! Have a great weekend.Monday, October 13, 2008


Countdown to Christmas Tutorial!
This tutorial was typed up a couple of weeks ago but since the class I had has passed, now I can put it on my blog! :)
So on to the project. I made this Countdown to Christmas box after seeing all the wonderful creations at SCS.  Here and here are the galleries. I read in a few uploads that storing the unused numbers can be challenging. So I came up with this wooden box from Michaels! I happened to have two of them that I bought months ago, intending to use it but didn't know what for! Well, when I saw those calendars and countdowns, the boxes were screaming at me! LOL Here is what you will need:
Here and here are the galleries. I read in a few uploads that storing the unused numbers can be challenging. So I came up with this wooden box from Michaels! I happened to have two of them that I bought months ago, intending to use it but didn't know what for! Well, when I saw those calendars and countdowns, the boxes were screaming at me! LOL Here is what you will need:3 different colored cardstock/patterned paper (I used 8.5 x 11 cs)
1"foam brush
Sanding block
Diamond glaze or Crystal Effects (SU)
Decorative edge punch (I used a scallop corner punch and took off the guide so I could make a border) OR decorative scissors
Cricut cartridge Christmas Cheer (this makes the lightbulbs. If you don't have a cricut or this cartridge, you could use purchased diecuts)
Cuttlebug embossing plate Swiss Dots
Small Alphabet Stamps (I used Image Tree lower case brush letters)
Small numbers set (I used Image Tree brush numbers)
Christmas stamp (mine is from a Hero Arts set)
1" chipboard circle (optional)
Bone Folder
Wooden box from hobby store These adhesives plus dimensionals.
  Perfect Paper Adhesive, Crafters Pick The Ultimate, Zig 2-way glue with a chisel tip, mono adhesive.
These adhesives plus dimensionals. Perfect Paper Adhesive, Crafters Pick The Ultimate, Zig 2-way glue with a chisel tip, mono adhesive.I used this inkpad.  And these magnets. I bought this roll from Michaels for less than $5.00. It's sticky on one side.
 Circle punches ranging from 5/8" to 1-1/8". These are from EK Success.
 Here we go:
When giving cardstock sizes, I will refer to the colors I used on my box, just to make it easier to understand.
Cut dark blue cs to 8-1/4" x 3-3/4" and 4-1/4" x 3-3/4"
The larger piece is for the front and sides of the box. The smaller piece is for the back only (no sides).
Adhere the larger piece, using a small amount of the Perfect Paper Adhesive and the foam brush. It's best to lightly dampen the brush first with water. Do not soak the brush! (I noticed with mine that the initial amount of glue soaked into the wood, so I applied a thin second layer.) Lay the box on it's side, brush the glue on the box on the side facing you. Lay your piece of cardstock on the box lining up all the edges and using a bone folder flatten the cardstock to smooth any bumps or bubbles. Now lay the box on its back, and place glue on the front in the same manner. Smooth the cardstock over the front of the box. Turn the box so the uncovered side is facing you. Place glue on that side and smooth the cardstock over it.
Leave the box alone for a little while and allow it to dry, about 30 minutes. Once it's dry, sand the edges a little, especially where the sides meet the back. You want this edge to be smooth before you adhere the cardstock on the back. Once you complete that, adhere the back piece in the same manner as before and sand the edges where the two pieces of cardstock meet each other being careful not to lift the edges of the previous cardstock you glued down.
Next, cut the light blue piece of cardstock to 4 x 3-1/2". Run this piece through your Cuttlebug then center and adhere it to the front of the box using your mono adhesive. You could also use double sided tape.
Next comes the decorative square on the front of the box. Cut a red piece of cardstock to 2-1/2" x 2-1/4".
Dark blue to 2-3/8" x 2-1/8"
Light blue to 2-1/4" x 2".
Use your ticket corner punch (not pictured) and punch each corner of each piece of cs. If you don't have one, use any corner punch that you like.
Adhere them together in the following way:
Center the dark blue piece of cardstock on the red piece and adhere them together using your mono adhesive. Set aside. Next, cut two pieces of the magnet about 1 inch long. Stick them to the back of the light blue piece of cardstock in the CENTER. Then put dimensionals all the way around the edges of the cs. Center this piece on the dark blue piece of cardstock. Next put dimensionals on the back of this whole piece and center it on the box.
Next cut a white piece of carstock to 8-1/4 x 1-1/2". This is for the trim of the box. Make the decorative edge using your chosen tool. I then trimmed the other long side so that when I adhered the strip to the box, it would only hang down about 5/8". Stick dimensionals along the straight side of the strip, OR place dimesionals along the top edge of the box and stick the strip on.
Next I stamped the letters on the white cardstock leaving plenty of space in between each letter so I could punch them out with the 5/8" circle punch. The red circles are punched with the 3/4" circle. They are adhered together with the Zig pen.
Oh I forgot you have to do the handle. All I did for that, was lay the box down and trace the curves on the dark blue cardstock and then cut it out with scissors. I adhered it to the box with mono adhesive.
The word "countdown" is mounted on pop dots. I adhered the u first so that it would be centered and then the o and n (which I am just noticing that I put on upside-down!!!!!!!!!!) and then the c and t. OMG I can't believe I did that! LOL.........okay I just fixed it. Whew!
Okay moving on.....the word "down" is also attached with pop dots but the letters overlap slightly. I lined them up first and decided where I wanted them and then attached them.
The word "to" is stamped on white cs, then layered on light blue and dark blue. The size punches I used are, 7/8", 1", and 1-1/8". This is stuck on a 1" chipboard circle for added durability and strength. The chipboard piece is attached to the box with the Ultimate Glue and then the layers are all attached together with the Zig glue pen.
The word "Christmas" is stamped on white cs and then mounted to the dark blue and attached to the box with square pop dots.
Okay on to the lightbulb numbers! I used my cricut on the 1-1/4" setting and I cut out the white lightbulb (background) on the shadow setting. The red part of the bulb is cut on the 1-1/4" setting without the shadow setting, and the grey piece is the accent piece on the same button as the bulb. All pieces are attached together with the Zig glue pen. The fun part is using the Diamond Glaze! There are some tricks to making sure you get no bubbles! First, don't shake the bottle EVER and always "burp" the bottle after each use. To burp the bottle, hold the bottle upright and slightly squeeze the bottle. This releases any air in the tube. Slow and steady squeezing is the key. Tip the bottle over to make contact with the bulb. Slowly squeeze the bottle. DO NOT RELEASE PRESSURE AND RESTART THE PRESSURE. THIS WILL MAKE BUBBLES! Don't worry about the color of the glaze. It does come out cloudy. Move the tip of the bottle down the lightbulb until it is covered. Don't worry it won't spread past the edge of the bulb. It's super cool! If you happen to get a bubble, I use a piercer to poke it and sometimes I have "dragged" my needle through the bubble and it moves over to the edge of the paper and I can get it out that way. They must dry on a flat surface!
Once you have all your bulbs covered, leave them alone for several hours. I typically let them dry overnight. After I am positive they are dry (you can tell they are dry when the entire piece is clear; no more cloudiness left.) You can now attach the magnets to the backs. And viola! You have completed your box! Yay! I will post another picture of the diamond glaze process. I tried to add it to this post, and for some reason I can't. Hope you enjoyed this tutorial!
Subscribe to:
Posts (Atom)