
Then I got my acrylic ruler and a pencil and drew in lines going from each corner of the box out to the edge of the paper. Then looking at the box I figured out which sections I needed to cut out.

In this picture you will see on the left, I wrote "cut out" or "leave attached.

I used a rotary cutter and my ruler as a guide to cut out all the sections that needed to come off. What you end up with is what you see below.
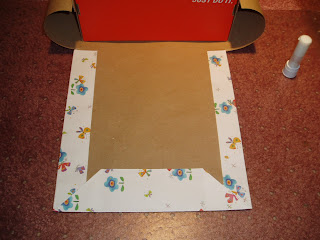
 Then I started attaching patterned paper. I lined up the edge of the patterned paper with the edge of the brown paper extending out in the other direction.....See below for visual.
I used glue stick and my brayer to make sure it was secure all the way to the edges and there weren't any bubbles. Then I just scored the patterned paper on all three sides to make some lines that I could see and I folded the corners in FIRST to make a nice corner and to be sure to cover all the brown paper.

Then I folded in the sides and attached them with gluestick......again using my brayer to smooth it out.
Of course, one of my dogs had to come be nosey and see what I was doing. Couldn't resist taking a picture of him!

I then just started attaching all the sides down in the same manner, just turned my box around when needed.

When I got to one of the sides, I attached the papers first and then I folded it into the box and attached it to the inside.

No comments:
Post a Comment