Brayered Sky Cardinal
Hi Everybody! Have you seen the Brayered Sky Technique on SCS? Michelle Zindorf is amazing! Her cards are gorgeous! I had to try it and let me tell you, it's not an easy technique! It's not as simple as loading up your brayer and running it across your cardstock! It took me a few tries to get rid of the verticle lines that sometimes appear and the horizontal lines between colors. But this is what I came up with.... I also did an asian one but I haven't mounted it on a card yet so I haven't taken pictures of it. For this one though, I used Summer Sun first, then Bashful Blue and then Ballet Blue. On a thread at SCS I read people having problems with the lines between colors.....I do find it hard to get the lines out once they are down. I used a cosmetic sponge instead of those yellow ones with holes for shading and also to blend the colors. The cosmetic sponges pick up more ink than the yellow ones do and I don't have to repeat this process as long. To eliminate the horizontal lines between colors, when I run my brayer across each ink pad, I take a piece of paper with a torn edge and lay that on the ink pad covering about 1/2 an inch on one end (on the short end). That way, when I run my brayer across the cardstock it has a wavy edge on the brayer and I don't get hard lines. Does that make sense? Or you can unload some of the ink on just the edges of the inked up brayer by tilting the brayer up and rolling just the end of the brayer on scrap paper first. This helps to not produce a hard line. If you get verticle lines, your brayer may have a dent running down the length of it that you don't notice. Try replacing the rubber. And when you store it, place it upside down so it rests on the handle and not the rubber. 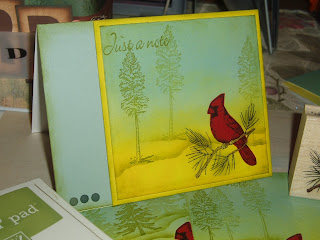 When I did these cards, I brayered an entire sheet of white cardstock; not just a piece at a time. That way I can crop and pick the best sections for my cards. I did the yellow first with the brayer and then I used the cosmetic sponge to darken it and fill in any empty spots. Then I used the lighter blue and did the same thing, followed by the darker blue. I then cut my cardstock in equal sections. I stamped the cardinal directly onto my brayered piece of cardstock with black ink. Then I stamped the cardinal on red cardstock with black ink and cut out just the bird parts, discarding the rest. I then attached the red bird parts to my brayered piece making sure to line them up with the stamped image below. I colored in the branch with watercolor pencil and then sponged some Old Olive on the pine needles.
  Then I stamped the trees with Old Olive. The lighter trees are achieved by first stamping on scrap paper and then onto the card front. The darker trees, I didn't unload first. To add the landscaping, I used a piece of torn paper and place it on the card front where I wanted it. I used Old Olive and a little pom pom and sponged it on. I moved the torn paper around the card front to make various little hills. In the picture below you can see that I used different trees on each one. After all the stamping was done, including the sentiment, I shaded all the edges with Old Olive.
  It's a beautiful look after you've practiced! LOL. I like how these turned out! I will definitely make more of them. What do you think? :)

 When I did these cards, I brayered an entire sheet of white cardstock; not just a piece at a time. That way I can crop and pick the best sections for my cards. I did the yellow first with the brayer and then I used the cosmetic sponge to darken it and fill in any empty spots. Then I used the lighter blue and did the same thing, followed by the darker blue. I then cut my cardstock in equal sections. I stamped the cardinal directly onto my brayered piece of cardstock with black ink. Then I stamped the cardinal on red cardstock with black ink and cut out just the bird parts, discarding the rest. I then attached the red bird parts to my brayered piece making sure to line them up with the stamped image below. I colored in the branch with watercolor pencil and then sponged some Old Olive on the pine needles.
  Then I stamped the trees with Old Olive. The lighter trees are achieved by first stamping on scrap paper and then onto the card front. The darker trees, I didn't unload first. To add the landscaping, I used a piece of torn paper and place it on the card front where I wanted it. I used Old Olive and a little pom pom and sponged it on. I moved the torn paper around the card front to make various little hills. In the picture below you can see that I used different trees on each one. After all the stamping was done, including the sentiment, I shaded all the edges with Old Olive.
  It's a beautiful look after you've practiced! LOL. I like how these turned out! I will definitely make more of them. What do you think? :)
No comments:
Post a Comment