But I do have some pictures of my Stampin Up Flip Chart. I mentioned it over on SCS and it's so hard to describe that I said I would take some pics of it. I hope that you guys can tell what it's supposed to be! LOL
I made this flip chart at my demo's house when I was still a demo. It was easy to make because she had them all printed out and cut for me! LOL. It has the basic colors from all the color families. It doesn't have the special colors that expire. It is great to have because I can choose the colors I want without having to pull my sheets of paper out. I will try to explain it the best I can....In this first picture, this is the front cover.
 I never decorated it so it looks plain but it has a plastic sheet on top from Walmart, cut to size. It is spiral bound using the Rubi Coil. There are four tabs across the bottom separating the color families.
 When you fip the first page up, you see the color Glorious Green.
 Also listed below the color name is the product number and available size. Colors don't come in 12x12 separately anymore. This chart is a few years old. The whole pad is cut into three sections. No specific reason why the far right column is wider than the other two. When you flip all the Glorious Greens up you will see three Green Galores next and then three Gable Greens after that. All the colors are done this way going through the whole book. The colors are in order according to how they are listed in the catalog.
In this picture you see Glorious Green, Yoyo Yellow, and Green Galore (I think). Say you were making a card and wanted to see how these colors looked together before you dig them out of your pile or drawer or paper tray. So all I did was flip the second row up til I saw the Yoyo Yellow and the far right section up until I saw the Green Galore.
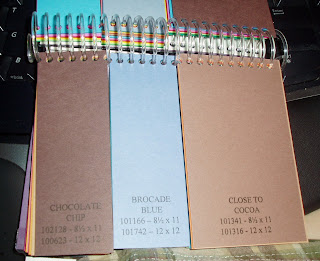
In the next picture you see Chocolate Chip, Brocade Blue and Close to Cocoa.
You can see how these colors would look together on a card. 
To make this book you would need every color in the catalog. My demo had all the colors so that's why I made it at her house. She just bought the multi pack of each color family. She ran them through her printer so the color names would be on each piece. You would each color through the printer with Glorious Green printed across three times. When the piece came out, you cut it into three strips. Then the next color goes through and you cut it into three strips. You're going to make three separate piles on your desk starting with Glorious Green and going down through the colors in the catalog. After cutting Glorious Green, flip them face down on the desk and then lay the next color face down on top of them. This keeps all the colors in the same order in each stack. Go through and print and cut each color flipping them over face down as you lay them on each stack. Then you cut a front and back cover and the plastic piece to protect the top. If you have some sort of binding machine like the Rubi Coil or the Bind it All, follow the directions with your particular machine on how to bind the book. I think that we punched the holes BEFORE we cut them into three pieces. Yes, that's right. Punch the holes before you cut the colors into three strips and make sure you keep the colors in the same order when you put the book together. Let me know if this doesn't make sense and I will take some more pictures!!
Have a wonderful night and thanks for stopping by!


Wow this is great. Would love something like this.
ReplyDelete