Showing posts with label Valentines. Show all posts

Sunday, March 15, 2009

Second post for today

These cards were really fun to make. Sorry I am showing them to you so late! lol I really love the card with the scallop cut out at the top. This idea came from Dawn's Stamping Thoughts.
Have a wonderful day! I am off to take the kids to soccer! Thanks for stopping by!

More pics related to yesterday's post

Hi again! Thanks for stopping by today. I couldn't get back to my computer yesterday so here I am today. These pictures are related to the cards I showed you yesterday but with different angles; just to share with you the depth of each card. It's amazing how much detail a little dimension adds to your card!

In the card above, I used a square punch and then cut the middles out with scissors. I don't have the photo corner punch otherwise I would have used that. The scalloped one is a Cuttlebug die. I added dots with a glitter pen.

On the card with the lion, both of those stamps are from Rubber Soul. I stamped the lion on the card itself and then I stamped him again on a scrap piece of paper and then cut the head out to add to the card. The red heart is on a dimensional and I used a glue pen and glitter to make it stand out from the other hearts.

Thanks for stopping by today; I do have more photos to share....have a wonderful day!

Saturday, March 14, 2009

Wow it's been so long!

Thanks so much for checking in! I haven't been on my computer for 12 days! And I haven't posted on my blog in over a month! So sorry I've been away for so long. I don't have the time I wish I had to create, or even be on my computer. But I do have some pictures to share with you. I did manage to make some cards while I've been gone! lol. I had a friend over to make Valentine cards last month. I was happy with what I was able to finish! Now I know Valentine's Day is long gone and we are fast approaching St Patty's Day but I really wanted to share them with you. Some of these ideas I saw on Dawn's Stamping Thoughts. She is super creative and her layouts are so fun and easy to recreate. For these cards I used a combination of Stampin Up paper and a paper pack from Michaels. The inks are Stampin Up.

Here's a supply list for all the cards above:

Stamps: Stampin Up Love You Much set, Bear (Rubber Soul), Hello Friend (Wordsworth by Rubber Soul), tiny Heart (Rubber Soul)

Ink: Stampin Up Pink Pirouette, Riding Hood Red, Basic Black, Close to Cocoa

Accessories: Markers from Stampin Up and Staedtler, Glitter pen, glue pen, Martha Stewart border punch and glitter, heart punch from Love You Much Bundle, 5/8" circle punch from EK Success, 7/8" circle punch from EK Success. Marvy scallop circle punch, Stampin Up Scallop Circle Punch, dimensionals and foam tape, paper piercer, white gel pen, Cuttlebug and embossing folder.

I have more to share with you but I will come back in a little while and post again. Thanks for stopping by!!!!

Monday, January 12, 2009

Cuppa Love

Hi all! I missed posting yesterday; sorry about that! I wanted to share this card but I was out most of the day. So here it is....Supplies Used:

Stamps: The Stamp Barn (Ottawa, ON) Cuppa Love, Hero Arts Polka Dot background
Inks: Adirondack Pitch Black, SU Ruby Red, Pretty Ink Pink, Close to Cocoa
Paper: Regal Rose and Pretty in Pink from SU, Watercolor Paper

Wednesday, February 6, 2008

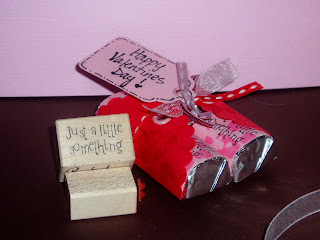
Nugget Wrap

It's been a snowy day here finally! We haven't had much snow this winter! It started snowing this morning around 7 am and by 10 am, we had more than 4 inches! :D I was so happy when I woke up and saw the white trees! So I turn on the tv and watch the news for school closings....a few schools in upstate NY were closed and one school in NH was closed. Nothing in VT was closed. So I get the two little ones up and ready (Katie got to go in later) and I put the other two on the bus. At 8:30 Jared leaves to take Katie to school which is about 20 miles maybe. An hour later, they call from the highway......they had only traveled 10 miles! They had just passed an exit so they had to keep going until they saw a turn-around thing in the median, which is illegal to use! LOL. He said he was going like 1/2 a mile an hour. He said it reminded him of when we lived in San Diego! LOL. So they turn around and head home. It took them an hour an a half for a 20 mile trip. Usually 40 miles takes about 45 minutes or so.
Later, today after the kids came home from school, they told me during dinner that their bus had gone off the road!! No phone calls home to the parents obviously and they were late to school. They couldn't pick up a child because they couldn't get down his street! I think they should have had a snow day!! What do you think? Isn't that nuts? Tomorrow if it's still snowing, which it is, we are keeping the kids home! No sense in risking their lives two days in a row!!! It's supposed to snow all night into tomorrow afternoon! So we'll see what happens tomorrow!
On to brighter things....here are current pics! Yay! I loved this project. You can find a wonderful tutorial here. Nichole does great tutorials! This was so fast and easy to make! I will have to make more for other holidays!
For this one, I used my Marvy Mega Punch....the pink scallop circle. I punched out two circles, stamped them with Stazon Blazing Red ink, folded them in half with the stamped side facing out, and set them aside. I then cut a retangular piece of paper, in a lighter shade cut to 2"x2 3/8", and set that aside. I attached the circles to the bottom of the rectangular piece by putting one half of the circle underneath and the other half on top of the retangular piece, making sure to butt the creases of the fold up against the side of the rectangular piece. I then set two large eyelets to accomodate the ribbon.I then stamped out my background design on the nugget wraps (swirly hearts from Inkadinkado). Then I stamped the sentiment in the center of each background. Then I cut them out to fit around the candy. I attached them with glue dots and then also attached them to the wrap with glue dots. After tying a knot with the red ribbon, I added several other ribbons and also stamped the tag. The punch I used is shown here. I set an eyelet in the tag so the ribbon wouldn't rip out and tied it on with its own ribbon. Viola! All done! They are wicked easy and wicked fast! Love 'em!

Monday, February 4, 2008

I saw this Hershey bar (link below) and thought it was beautiful! I hadn't tried the dahlia fold yet and thought this would be the perfect start! I didn't have to fold as many circles! LOL
http://www.splitcoaststampers.com/ga...7926?si=dahlia
I made several changes when I made this so that I wasn't completely copying! :) I stamped everything! I used circle stamps called Box of Dots from Hero Arts and stamped the wrapper using the rock and roll technique with pinks and reds. I also used the tiny heart pictured and another background stamp that has three tiny dots on it.I punched out the wings using my Marvy scallop circle (the blue one) and I stamped them with an Inkadinkado stamp. I used stazon blazing red to do that. I stamped on both sides of the scalloped circles so that when folded, everything would be covered. I then made the folds and then used my prismacolor red and roughly colored around the edges and creases. I then used a blending stump and baby oil and blended the color into the wing.I cut the body out with a wine bottle shaped punch from Marvy. I punched two out and adhered them together at the necks. I punched the heart for the butterfly body with an EK Success punch. I then colored it with a black prismacolor pencil and blended it with the baby oil and stump.I punched the large heart for the sentiment using a Marvy punch. I then put together the butterfly on the background by first positioning the body, then each of the wings. Then I put on the heart with dimensionals. I used brown wire for the antennae and adhered them underneath the body. Then I stamped the sentiment on the heart and used the red pencil and baby oil around the edges. I then adhered that to the wrapper. After everything was attached, I used stickles on the wings and around the folk heart.Then I put diamond glaze on the body to make it stand out a litte more. That's it! I then let it dry before I wrapped my candy bar! Thanks for stopping by! What do you think?

Valentine Cootie Catcher

Can I just tell you how fun these are to make?? I saw so many of these popping up in the gallery today and decided I had to try one! This was one of the Try a New Technique Challenges at SCS. Click here for instructions and samples.

They're fun, and a little time consuming but I love the reward at the end! I used my Marvy punches as well as EK Success small folk heart and tiny folk heart, EK Success 1" and 1 1/8" circle punches. I used two stamps as well; sentiment by Stampa Rosa, and a tiny circle stamp. It actually has three tiny dots on the stamp and it came with a backgrounds set from Joanns or Michaels.The tiny brown hearts are raised with dimensionals, The large bow is wired ribbon to hold it's shape, the little white bows are attached with glue dots, the circles are also attached with glue dots. Each pocket flap is lined with red cardstock. The large pink heart is also raised with dimensionals. I used a popsicle stick to hold the large heart and then cut a slit on the top of the peak and slid the stick through. It actually touches the table so it gives it more stability. I used uchida inks for my distressing and stazon blazing red for the sentiment. Here are the instructions for the fortune teller fold. It's very simple; remember those cootie catchers we made as kids? Same thing!
After making all the folds, I unfolded mine and then in each corner I stamped my dots. I started out with an 8x8 piece of cardstock so my squares in each corner were 2 inches in diameter. Once I stamped in each corner, I flipped the cardstock over and in each corner again, this time I put a piece of red cardstock that was slightly smaller in diameter (1 7/8). This gave me my lined pocket flaps. When you fold down the flaps you see the red. The entire project is made from cardstock and can be hard to fold so you have to use a bone folder to get crisp creases. Hope you try on of these too! Thanks for stopping by!


Tuesday, January 29, 2008

Valentine Cards

Started making Valentines Cards! Early start, actually! I am usually trying to get some done at the last minute! So here's my first Acetate card. Okay, don't laugh at my terrible embossing job! ;) I couldn't get all the powder off around the words. Acetate is so clingy! Next time, I won't emboss on the acetate. This heart pocket was inspired by http://www.splitcoaststampers.com/ga...73109?cat=3741however, I made this heart bigger using my Cricut and scallop circle punches. Much faster to have tools cut it out for me! LOL I have a punch that has 3 different size tags on it and that's what I used for this tag. I pierced the scallop circles and the heart. I added faux stitching to the heart after piercing it.I like how it turned out with the exception of the embossing mess! LOL This is my first pocket heart card based on the template provided here http://www.splitcoaststampers.com/fo... heart+pocket

A lot going on for this one;I used my word window punch to do the scallops and then a 1/16" punch on each scallop. A large brad holds it closed and attached to is wire and a tiny tag from a tag punch I have that does 3 different sizes. I stamped Love on the tag using a hero arts stamp.I did faux stitching with my white gel pen around the hearts.On the flaps of the heart, I used versamark and a stamp from Art Impressions to randomly stamp the hearts.I used several different ribbons and fiber and hanging from it is the word LOVE stamped on shrink plastic with an Inkadinkado stamp. I used red stazon and prismacolor pencil to color in the L.I used 4 different different prima flowers and a brad and attached it to the heart with a glue dot.I rubbed chalk ink over the white cardstock to pull out the embossed flowers and mounted the whole thing on pink cardstock. I used my ticket punch on each corner.Whew!

So here is one I did using Inkadinkado stamps. The sentiment is from Stampa Rosa. I used my CB to emboss the chocolate cardstock and then adhered it to a white card. The sparkly pink papers came from my LSS and I don't know who makes them. I used Stazon Blazing Red to stamp everything on this card. I cut the kitties out and mounted it to the darker pink paper. I found the little heart stickers from Michaels and they are from Stampendous. I also used my word window punch and my ticket corner punch as well as some brads. This one looks sooo much better in person. Sorry about the not so great picture. The shaker box is made of acetate and foam core board. I used my Fiskars Fingertip Craft Knife to cut a heart shape out of the foam core board. I used my scallop heart punch to do the heart on the chocolate cardstock. The background of the shaker box is also chocolate cs that I ran through my cuttlebug. I cut the kitties out and adhered them to the embossed cs. I used a handheld heart punch to do all the hearts inside the box. I wrapped the white heart ribbon around the top of the shaker and then wrapped 1/8" red ribbon around the edge of the box so you wouldn't see the foam core. Then I adhered this whole box onto my red cardstock. That then went onto pink cardstock and finally my embossed chocolate cardstock. Lastly, I added dots and stitching with my white gel pen. I love how this turned out!
So what do you think? Any comments are appreciated! I am having so much fun making these cards! Thanks for stopping by!