


 I love him! He's much smaller than I originally imagined; only fitting maybe two chocolate nuggets inside. But the great thing is that he's made from punches only! A little bit of white gel pen and black marker, ribbon, pompom, and dew drop, and viola! You have a bunny!
 I love this little card. He came in a clear stamp set from SandyLion. I found it at Michaels. I stamped him on SU watercolor paper using India ink, colored him with SU watercolor crayons, filled his belly and ears with fun flock, and cut him out. I stamped flowers from the same set using the Rock n' Roll technique. I then sponged in clouds, and the grass and added some yellow with a sponged on top of the flowers. I then cut a strip of garden green cs and made tiny little cuts in it and rolled the top edge with a pencil and my fingers and attached it at the bottom. I added sheer ribbon and three dew drops. He's a little more yellow than I intended but I think he's pretty cute! :)
 Watcha think? Thanks for stopping by today! Have a great week!!


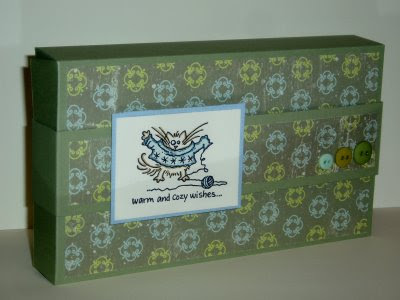

 And this is a box I came up with for standard sizse cards using the same basic tutorial. I don't know if someone else has already come up with these dimensions, so I apologize if I am stepping on anyone's toes! :) The snowman is from a Hero Arts acrylic set. I did a little bit of paper piecing with his hat and gloves.
 I am suffering with the flu right now. I thought I could sit here at my computer and catch up but I don't feel very well, so I am off to bed again! I will post dimensions to my box when I feel better! Thanks for stopping by! Have a great weekend.
 This one I made using a plain wooden box from Michaels (by Darice). I love the shape of this box with the rounded sides. On my previous boxes I used round knobs for the handles and feet but this time I found some more decorative knobs. I believe they are called finials. The paper I got from my local stamp store, don't know which company it is, sorry. The polka dot paper is a hot pink which match the radishes on the printed paper. All the paper is attached with gluesticks.
  The apron on the lid is doen with pink cardstock, and the polka dot paper. I found this really cute card on SCS and thought it would look perfect for the box! So i drew out an apron trying to make it the same on both sides. The ribbon for the neck and waist line is chocolate gingham. I really love how this turned out; much better than my other ones! :)
  The dividers are plain ones from Staples and then I covered them with cream colored cardstock, and then added a strip of polka dot paper along the bottom. I used my Cricut to cut out letters for each tab. I didn't stagger my tabs across the top just in case I wanted to change the order of the dividers so each tab is lined up to the left. Now I just have to fill it with recipes! :) Thanks for stopping by! What do you think?


 Here is my other recipe box. I like this one better. This isn't the one I am teaching in my class because the people taking the class don't want the dimension on the top. So this is for my own personal use.
 This one is made the same way basically. I didn't mat the letters on the front and I cut out extra fruit and raised them with pop dots on the lid. I also added a ball to the top to look like a handle. My dividers will look a little different but I haven't finished those yet. I will post those pics when I get them done. :)


 They had these cute little pieces called knobs. Rounded on the top and flat on the bottom. They come in different sizes so I just picked what fit on the dome lid. And there! I had all my pieces. Next came the assembly...

 This Post It Note Holder was inspired by Cambria's found here. I used rounded corner coasters for the top and bottom covers and covered them with patterned paper. I again used my Cuttlebug to do the center piece. Very easy to make!
