
Okay first I have to say that this is not my pattern! Jan Tink shared her template on her blog and I actually made a chocolate version a while back. You can find her template here.
Here are the steps:
Here are the steps:
I cut the base of the purse from pink cardstock. It measures 5 1/2" x 10 1/2". On both long sides, score at 1 1/4” .
 Turn the paper and on both short sides score at 4 1/4”.
  Now cut on the last two score lines that you just made 1” to the other
score lines.
 It should now look like this.
 In this picture you see my scoring blade about 3/8" from the top of the purse front. I made a little mark so I knew where to place my word window punch.
 At this point I did all my stitching lines with a white gel pen (the one from SU is the best). I used my short ruler as a guide so my lines would be straight.
 First I went along all the score marks (on either side of the score marks) going in one direction.
 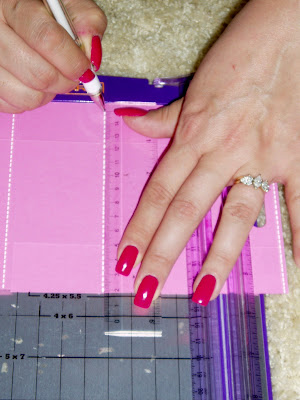 Then I turned my paper one quarter turn and made all the stitch marks going in the other direction. Make sure your marks are DRY before you turn the paper or move the ruler. I made the mistake of dragging my ruler after making a fresh line of stitches and smeared them all! So I had to start over! UGH!!
 I made lines around the punched opening and along the top edges. This is what it should look like when you are done. Okay see that center rectangle which will become the bottom?....You don't have to make stitch marks there.........I was just on a roll and kept going! LOL
 Next, you are going to make sure this is completely dry before you run it through your cuttlebug! Place the embossing folder with the bumps facing up (the word Cuttlebug should be facing up) and your paper should be face up as well. When placed this way, the raised bumps will be on the outside of your box. If you do it the other way, your box will have dimples. LOL I don't worry about the bottom of the box having a texture so I just center my cardstock to cover the front and back of the box. In this picture, I am doing the back of the box.
 Then you turn the paper around and do the front of the box.
 This is what it looks like when you are done.
  Now it's time to put it together.... in this picture you can see my Tombow but hopefully you can also see some glue dots going along the sides of the top of the box. I just used a few for extra strength. I fold the flaps in like this and then put adhesive on all four sides of the the flaps. Then I only put adhesive on the the top portion of the box where the punched out hole is.....you don't have to put adhesive on the back of the box.
  Once you have all the adhesive on, fold the back of the box up and attach it to the flaps. Then you fold the front of the box up and attach that to the flaps and the sides.
 Once that is complete, it should look like this.
 Now you can move on to the belly band. The pattern paper is 1 1/2" x 12". The solid piece is 2" x 12".
  Adhere these two pieces together and add the stitching along both long sides.
  In the picture below, you will see that one end of the belly band is bent. Score just one end at 1 1/2"
  Place this bent piece on top of your box on the front. Don't stick it down yet. Turn your box around (the opening of the box is now facing you) with the belly band laying underneath it (the bent end is still where the front is) and the long end of the band is sticking out to the right.
  See where the belly band is sticking out? You are going to make a little mark with a pencil right next to the box on the belly band. You are marking where your next score mark is going to be. Because each box may be a tad different, score marks can not be pre-determined. So this is how I got a nice score mark all the way around the belly band. In the picture below, I have moved the box out of the way so you can see the mark I made for the new score mark. Now score it.
  Okay now you have two scored lines on your band. Now the band is underneath and the box is face up. You are now going to make a mark on the left of the box on the belly band.
  Now keep going in this manner until you have scored the whole band. It should look like the picture below.
  I ran adhesive down each score mark with a glue dot on each line as well. Can you see them in the picture below?
  To adhere it tot he box start at the front of the box again and adhere the end of the band to the front of the box about 3/8" below the punched hole. Go all the way around until you reach the front of the box again with the other end of the band. It should now look like this.
  Now we move on to the closure band that goes from the back of the box to the front and into the punched hole. Cut the solid cardstock to 1 1/2" x 7". Cut the pattern paper to 1" x 7". Adhere these two pieces together and do more stitching along both long sides.
  Round the corners on one end of the strap with your corner rounder.
  Adhere it to the back of the purse inside the box in this manner.......I slid the rounded end through the punched hole making sure I had enough length inside the box so that it wouldn't slide out. Then while that end was still in the whole, I grabbed the other end and attached it to the back, INSIDE THE BOX.
Now to make the strap, cut a solid piece of cardstock to 3/4" x 11". Make more stitch marks! You're are going to hate faux stitching after this! LOL Once that is dry attach it to the box by punching a hole about 1 1/2" from each end. Then using your strap as a guide, punch holes on each side of your box. Place your strap in the box lining up the holes and place your brad through the flower and then through the holes and then open up the brad inside the box. Repeat this on the other side. This is now what your box should look like.
  Now we move on to the medallion. Which I punched from scallop circle punches. First I stamped the cupcake and colored it and cut it out. I used Staedler Markers for coloring. They have a nice foam tip, so they will always stay pointy. I set that aside to dry.

Repeat this on the other side. This is now what your box should look like. Now we move on to the medallion. Which I punched from scallop circle punches. First I stamped the cupcake and colored it and cut it out. I used Staedler Markers for coloring. They have a nice foam tip, so they will always stay pointy. I set that aside to dry. Then I punched out the circles I needed.
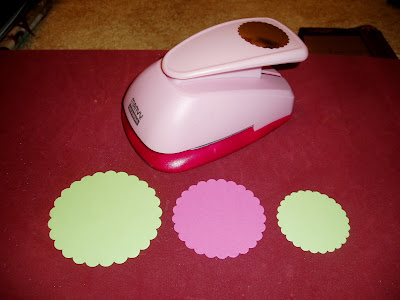 Next you assemble the circles. I adhered the larger green circle onto the box first. Then I put pop dots on the pink layer. The green goes on top of the pink and the cupcake goes on top of that.
Next you assemble the circles. I adhered the larger green circle onto the box first. Then I put pop dots on the pink layer. The green goes on top of the pink and the cupcake goes on top of that. 
 There may be lots of pictures and steps in this tutorial but don't let that intimidate you; they are very easy to make! And fast too! Have fun! Let me know when you make one so I can see your masterpiece!


