Hi everyone! Hope you all had a great Tuesday! Thanks for stopping by for a visit! This year, (and I don't normally make New Year's Resolutions), I am hoping to keep up with my blog more regularly. When I first started a couple of years ago, I was doing pretty well. LOL! But of course you all know how life takes over! Unfortunately, I let it really take over! LOL! Anyway, I have a mini to share that I made several months ago for a dear friend who lost her father. I used a tutorial from Laura @ Follow the Paper Trail on her paper bag flip album.
This was a super fun mini to make. It came out rather thick as you can see! lol. It is made with a chipboard cover and spine and the closure is Grunge Paper from Tim Holtz. It is held in place by a small disk magnet from Basic Grey.
The spine is covered with brown canvas from Joann Fabrics. All of the fibers and ribbon are tied onto 2 D-rings from Tim Holtz. The charms are assembled on a Swivel Clasp, also from Tim Holtz.
This is the first page. I have yellow sticky notes on the photos to protect identities. The reason this album is called a flip album is because you flip the direction of the opening of the bag from page to page. So the opening on the first page is to the right. The second page the opening flips to the left, and so on.
I have handmade most of the flowers in this book, except for the really small ones. In most cases, the flowers are punched from paper first and then distressed and layered together.
The phrases in the frames are ones that I printed from my computer. The dangling charm is a Tim Holtz Fragment with paper adhered to the back.
I used ribbon and silver washers from the hardware store. I distressed the washers with Tim Holtz alcohol inks to get the desired color. They came out a bronze-y, aged finish.
The side pockets are made from Tim Holtz on the edge dies. The pearls on the edge of the lace are individual pearls that I hot glued on. The tags are made with my Cricut.
The initials are from Making Memories. I printed Twinkle Toes on one of the tags because they loved to dance.
A rolled rose that I made and some Prima Bling!
Like I said, this was a super fun album to make! It wasn't super fast, but it was fun. I enjoyed every minute I spent making this very special album. Video to this album.
Thanks again for stopping by and if you have any questions, please don't hesitate to ask!
Hugs,
Rachel


 My husband came down and I showed it to him and he said, "now why don't you mass produce that and send it out to people???" I whipped my head around to look at him with this dumbfounded look on my face and said to him, "WHAT???.......do you know how long it took me to make this card????" LOL I started making this last week! Then I got sick (brochitis) and I finally finished it this afternoon! Sometimes he kills me! LOL
  I used a larger size stylus and a foam pad and laid the flower on the pad and made little circular motions with the stylus in the center of the flower. This brings the petals up and pushes the center down. Then I glued each layer together and added a dew drop. The ones that have brads, I didn't use glue to put the layers together. The brads hold the layers together.
 Here you can see the embossed pot and the punched edge of the pot. I used a Martha Stewart border punch and I used my Cuttlebug to emboss the pot. After both of those things were done, I used a sponge and close to cocoa ink and swiped it across the pot so the dimension would pop.
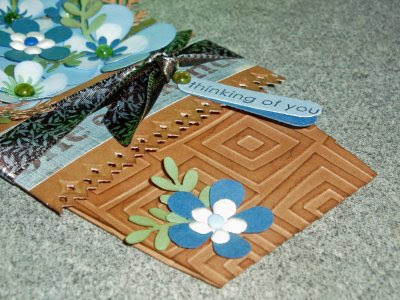 Here you can see the card with the flowers taken out. I used the same border punch to punch the blue cardstock.


 I love him! He's much smaller than I originally imagined; only fitting maybe two chocolate nuggets inside. But the great thing is that he's made from punches only! A little bit of white gel pen and black marker, ribbon, pompom, and dew drop, and viola! You have a bunny!
 I love this little card. He came in a clear stamp set from SandyLion. I found it at Michaels. I stamped him on SU watercolor paper using India ink, colored him with SU watercolor crayons, filled his belly and ears with fun flock, and cut him out. I stamped flowers from the same set using the Rock n' Roll technique. I then sponged in clouds, and the grass and added some yellow with a sponged on top of the flowers. I then cut a strip of garden green cs and made tiny little cuts in it and rolled the top edge with a pencil and my fingers and attached it at the bottom. I added sheer ribbon and three dew drops. He's a little more yellow than I intended but I think he's pretty cute! :)
 Watcha think? Thanks for stopping by today! Have a great week!!
