Sunday, January 27, 2008

Christmas Layouts 12x12

Wanted to share some Christmas Layouts I did. Some of the ideas were inspired by a book I have that I absolutely love! The first layout was so fun to do! I love to use chalks so you'll see chalks on every page, by the way!
In this layout, I did "presents" with rub on letters on white cardstock and then punched out each letter with a 1 inch square punch by EK Success. Then I chalked all the edges, alternating red and green letters. On the letters "P" and "e" and "s", I added an eyelet and some ribbon. Then I adhered them to the page.
I love this little detail....after adhering the red cardstock, I set eyelets on the red and also the printed paper about an inch and a half apart. I then tied ribbon between each set of eyelets. A fun little detail!
In this layout, I used patterned paper and cut them into strips and then rounded the corners. I again used chalk on all the edges. I punched holes and tied ribbon to each strip.

The little white journal boxes have brads set in.
On the next layout called "My Christmas Jammies," I added a lot of elements; fiber, chalk, rub on letters, QuicKutz letters, tags, faux stitching, and a secret journaling box.

Here's a close up of the tags that spell out "jammies". Each letter is stamped and then each tag is chalked. Then each tag is hung by the light blue fiber running across the page.

Here's a closeup of "my" and the first part of Christmas. The word My is done using rub on letters, and Christmas is done with QuicKutz.

Here is the secret journaling box. The mat for the photo isn't attached on the right side so you can pull out another piece of cardstock from behind it. The letters are stamped with brown ink.On the next layout, I used a few different patterned papers. At the bottom you'll see a pocket with a circle vellum window in the center. The pocket is made file folder style and adhered together on three sides with the top left open for a journaling card. Once the journaling card is written on and placed inside, you can see it through the vellum.

Close up of a journaling box. The numbers are stamped on patterned paper and then mounted on red cardstock. I used circle punches to cut them out.

Here is a closeup of the pocket. It is held together with staples on the sides.

The last Christmas layout is simple and I couldn't get a decent photo of it. Sorry about that. I even did some editing on my computer and this is the best I could do. Just two different colored cardstocks and two different patterned papers. The strip across the top of the page has stamped words; christmas, tradition, family and gather.Here is a close up of the words across the top.Hope you enjoyed my layouts! Drop me a line and tell me what you think! Thanks for stopping by!

Saturday, January 26, 2008

Fiskars Fingertip Control Craft Knife

Have you all seen this? Or does anyone have one? I just purchased mine today and haven't used it yet but saw it in a magazine and had to get one! 3.49 at Michaels! Check it out here...
http://maggiesscrapbooking.com/images/7848406305.JPG
In all it's like 3 inches long. It grips your index finger and you're supposed to have much more control when cutting. I can't wait to try it. If you have this, let me know what you think! ;)

Ribbon Spools

Look what I made with empty toilet paper rolls and my scallop circle punches! Ribbon spools! I plan on hanging them on some wooden dowels. The center hole is punched out with a 1 1/8" circle punch. I glued the scallop circles to the toilet paper roll with diamond glaze. They are holding up great! I plan on making more colors this weekend, so I will be posting those as well!

Punch Holder

Hi Everyone! Having a nice weekend so far? Sorry I haven't posted in a while.....haven't had any pictures to put up until now! My husband and I put up some dowels in my craft room to hang my punches on! I love it! I used to have them in a canvas shoe holder that hangs on the door but I like this much better! I finally have some of those mega punches that everyone raves about! I love those too! :)

Monday, January 14, 2008

Brayered Sky Cardinal

Hi Everybody! Have you seen the Brayered Sky Technique on SCS? Michelle Zindorf is amazing! Her cards are gorgeous! I had to try it and let me tell you, it's not an easy technique! It's not as simple as loading up your brayer and running it across your cardstock! It took me a few tries to get rid of the verticle lines that sometimes appear and the horizontal lines between colors. But this is what I came up with.... I also did an asian one but I haven't mounted it on a card yet so I haven't taken pictures of it. For this one though, I used Summer Sun first, then Bashful Blue and then Ballet Blue. On a thread at SCS I read people having problems with the lines between colors.....I do find it hard to get the lines out once they are down. I used a cosmetic sponge instead of those yellow ones with holes for shading and also to blend the colors. The cosmetic sponges pick up more ink than the yellow ones do and I don't have to repeat this process as long. To eliminate the horizontal lines between colors, when I run my brayer across each ink pad, I take a piece of paper with a torn edge and lay that on the ink pad covering about 1/2 an inch on one end (on the short end). That way, when I run my brayer across the cardstock it has a wavy edge on the brayer and I don't get hard lines. Does that make sense? Or you can unload some of the ink on just the edges of the inked up brayer by tilting the brayer up and rolling just the end of the brayer on scrap paper first. This helps to not produce a hard line. If you get verticle lines, your brayer may have a dent running down the length of it that you don't notice. Try replacing the rubber. And when you store it, place it upside down so it rests on the handle and not the rubber.
When I did these cards, I brayered an entire sheet of white cardstock; not just a piece at a time. That way I can crop and pick the best sections for my cards. I did the yellow first with the brayer and then I used the cosmetic sponge to darken it and fill in any empty spots. Then I used the lighter blue and did the same thing, followed by the darker blue. I then cut my cardstock in equal sections. I stamped the cardinal directly onto my brayered piece of cardstock with black ink. Then I stamped the cardinal on red cardstock with black ink and cut out just the bird parts, discarding the rest. I then attached the red bird parts to my brayered piece making sure to line them up with the stamped image below. I colored in the branch with watercolor pencil and then sponged some Old Olive on the pine needles.
Then I stamped the trees with Old Olive. The lighter trees are achieved by first stamping on scrap paper and then onto the card front. The darker trees, I didn't unload first. To add the landscaping, I used a piece of torn paper and place it on the card front where I wanted it. I used Old Olive and a little pom pom and sponged it on. I moved the torn paper around the card front to make various little hills. In the picture below you can see that I used different trees on each one. After all the stamping was done, including the sentiment, I shaded all the edges with Old Olive.
It's a beautiful look after you've practiced! LOL. I like how these turned out! I will definitely make more of them. What do you think? :)

Friday, January 11, 2008

Weight Loss Journal

Look! I made something today! LOL. This was a spiral bound notebook I found in the dollar bin at Michaels and I finally figured out something to do with it! The cat stamp is a Penny Black stamp and I colored it in with watercolor pencils and blended with a Dove Blender. I applied clear EP over just a few of the flowers and also the sun. The sun looks silver in this picture but it's not :) The ribbon is wired and 1.5" wide.
After I colored in the image, I used my Ticket Punch. Then I used a stipple brush and Bashful Blue and added a little color around the edges. Then I mounted the image on a piece of white foam core matboard the exact size of the image. Next I mounted that onto Bashful Blue Cardstock which I also punched with the Ticket Punch.


This is what the notebook started out looking like. Just plain pink and white stripes. Picture is a little blurry sorry!


I ran my cardstock through my Cuttlebug for some interest. Then I attached the ribbon.


Then I attached the cardstock to the notebook. I haven't decided if I want to put something in the blank space at the bottom of the book or leave it as is. I toyed around with some things but didn't like them. So I may just leave it alone! I plan on using this as a weight loss journal. Thanks for looking! :)


Wednesday, January 9, 2008

Post It Note Coaster Book/Pocket Notes Purse Box

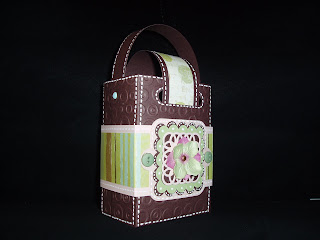
These are things I made a few month ago at least; before my blog days! The Pocket Notes Purse Box, which is JanTInk's creation from SCS, is something I had to try! I used my Cuttlebug on the entire box and added stitch lines to all the edges. I used my Cricut to add multiple layers to the front. This was a fun box to make! Thanks Jan for the inspiration! This Post It Note Holder was inspired by Cambria's found here. I used rounded corner coasters for the top and bottom covers and covered them with patterned paper. I again used my Cuttlebug to do the center piece. Very easy to make!


12x12 layouts


Wanted to post some layouts I did. I have them in my gallery at Splitcoast but

wanted to post them here for friends and family who don't visit Splitcoast. All the letters I cut out using my Cricut. I love the layers of vellum in the top layout! Thanks for looking!

Super windy here today!!!

Wow, the wind here is amazing today! My kids didn't want to stand outside and wait for the bus this morning! Lauren said she was "flying" outside! LOL. It's pretty mild as well; temps in the high 50's yesterday and today. Thirty degrees higher than normal for this time of year!

Last night, I helped count inventory at my local stamp store. 5 hours either sitting on the floor or hunched over. My back is killing me today! It's amazing what 900 square feet can hold! LOL

Going to try to get some projects done today. I have a lot of cards and such to make. I will try to get something posted tonight!

Have a great day!

Tuesday, January 8, 2008

Covered Shoe Box for Toys

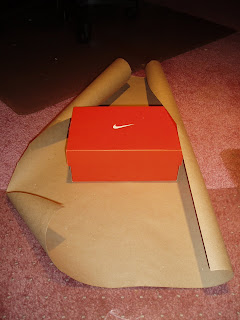
Lauren needed some small boxes for her tiny little ponies and accessories.......so I found some shoe boxes and decided to cover them! I started with brown kraft paper, and basically cut it like I was going to wrap a present.

Then I got my acrylic ruler and a pencil and drew in lines going from each corner of the box out to the edge of the paper. Then looking at the box I figured out which sections I needed to cut out.

In this picture you will see on the left, I wrote "cut out" or "leave attached.

I used a rotary cutter and my ruler as a guide to cut out all the sections that needed to come off. What you end up with is what you see below.

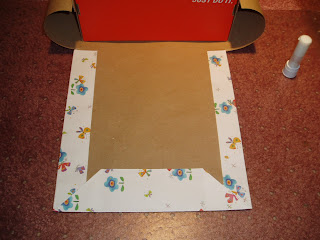
Then I started attaching patterned paper. I lined up the edge of the patterned paper with the edge of the brown paper extending out in the other direction.....See below for visual.
I used glue stick and my brayer to make sure it was secure all the way to the edges and there weren't any bubbles. Then I just scored the patterned paper on all three sides to make some lines that I could see and I folded the corners in FIRST to make a nice corner and to be sure to cover all the brown paper.
Then I folded in the sides and attached them with gluestick......again using my brayer to smooth it out.
Of course, one of my dogs had to come be nosey and see what I was doing. Couldn't resist taking a picture of him!
I then just started attaching all the sides down in the same manner, just turned my box around when needed.
When I got to one of the sides, I attached the papers first and then I folded it into the box and attached it to the inside.


Covered Shoe Box for Toys Continued...

Here you see that I have attached the two sides to the box and now I am on the front of the box. (I am holding the lid up and the box is laying down on the front). I secure the patterned paper to the brown paper first doing the corners as I did on the sides to make a nice corner and then the sides as you see below.


In the picture above you see the excess paper folded up. This is what goes inside the box. But I first adhered it down with glue stick like you see below.


With the front and two sides attached I moved on the back and lid. I folded in and attached the little sections first as you see below, and then adhered patterned paper to those long curled up sides you see. I attached those as before and then I was done!


I decided to attach ribbon along the lid edge to pretty it up! :)


I held the ribbon in place with clips until the glue dried. The box looks just as you see it above, without other embellishments which I have to add now! LOL


Hopefully this was easy to understand........I just thought I would share what I did over the weekend!

Patriotic Handmade Album


Hi Everybody! I haven't posted in awhile! Sorry about that! I have been setting up classes to teach at my local stamp store for February, so I have been trying to come up with ideas and plan out my schedule.
This is a handmade album that I did last summer and came across it and wanted to share it with you. Here's how it goes together.....
I started with 2 pieces of foam core mat board approximately 5x7 inches and one piece that was 1x7 inches. I laid these on a piece of 12x12 patterned paper and cut the paper to the appropriate size allowing an inch border all the way around. When I placed the matboard down I left a tiny space between each piece. The smaller piece becomes the binding and when you open and close the book, the space that you leave between each piece allows for this motion very easily. I used glue stick to adhere the boards down. The excess paper gets folded in toward the inside of the book and then I covered the inside covers with coordinating patterned paper which covered the rest of the matboard and covered the edges of the patterned paper coming from the front of the book. I made sure to run my bone folder down those little spaces between each board so that it would open and close easily. The USA and the saying down the binding are stickers that I purchased with the paper. The book is held shut by a piece of ribbon attached to the back of the book, and around to the front. On the front I used a piece of velcro and then covered the edge of the ribbon with a large button.
I then adhered a large sticker on the inside front cover. The pages are cut slightly smaller than the matboard to allow a nice border all the way around. The pages are held together with ribbon and star shaped eyelets but the holes go all the way through to the matboard and you can see the ribbon going across on the back when the book is closed. The matts for the photos (which I haven't added yet) are all aged on the edges with chalk inks.


"Freedom" "Liberty" and "Democracy" are attached at follows:
I cut pieces of blue cardstock and put them aside. I printed the words on transparency paper and cut them out to place on top of the cardstock pieces. Then I attached the two together with brads. Each "sign" is attached to the page with dimensionals. I love those little things! :)


It is a fun and easy book to make. I might use book board next time or use really big brads to attach the pages to the book. Overall, I am very happy with it!

Tuesday, January 1, 2008

Accordian Tag Album

This was a fun little album to make! Again, this was done over the summer in a class. I love the fun bright colors and all the great embellishments. There's a lot going on in this tag album but it was fun and easy to make!


Chipboard Album


I made this little chipboard album several months ago but I love it. It's actually from a class that I took from a fellow teacher at the same store. Obviously I haven't added pictures to it yet! LOL. It's made of two pieces of chipboard for the front cover. One narrow piece where the eyelets are and then the larger piece to the right. They are covered with cardstock with an eighth of an inch space between the two so that the cover can flap open.

The inside of the front and back covers are lined with mulberry paper. The first page has a cute little quote.

A lot of the embellishments came in sticker form from the same company who makes the paper. It made decorating the pages very quick and easy!


12x12 layout of Hershey!

Here's my big boy Hershey! Well he's actually the smaller boy! In the top picture he is eating snow which we have plenty of! The middle picture on the bottom he is eating ice cream!! LOL. The numbers are from We R Memory Keepers, Urban Window, On the Dot Goodie Box. The letters are from We R Memory Keepers, Love Letters, Comstock Collection. I can't remember where the paper is from. LOL