Hey Peeps! Things are slowly coming together on my end! I started a facebook page last night centered around my Zibbet Store. Please go check it out if you have a moment. ;-) It's called Rachel's Jazzy Creations. Oh, and please refer a friend! Or two, or three, or fifty! LOL. Thanks for stopping by today! Have a wonderful week!

Monday, July 29, 2013
Sunday, July 28, 2013
More New Jewelry for my Zibbet Store!
Hey Everyone! Thanks for stopping by! I hope you all had a wonderful Sunday! Was definitely a lazy Sunday in my house! But I did upload and edit more photos of the jewelry I have been making. OMGosh I am having a blast making these bracelets! LOL! I am thinking within the next few days I will open my store. Yayyyy! So here's a few more...


I seem to favor the aquas and teals, huh? LOL!! The 4th one is for a custom order but the rest will be listed. I just love BLING! :)
Thanks for visiting!!! Have a wonderful week!
New Jewelry soon to be listed in my Zibbet Store!
Just wanted to share some new bracelets that will be listed in my Zibbet Store very soon! I am so excited!! I have a few more that I haven't photographed yet, so stay tuned! Thank you so much for visiting! Have a wonderful weekend!


I'm a PERMANENT Designer for Ephemera's Vintage Garden!!
Exciting news!!!! OMG!!! Debbie asked me to be a permanent member of her team at Ephemera's Vintage Garden!!! I am so beyond excited I can't even tell you!! This is my first time being on a Design Team and I am so honored! I am still working on a project using the Coral Blues collection I have featured twice already. Even though I will have a new kit to work with in August, I will still share my completed Coral Blues project. I can't tell you enough how lovely Debbie's designs are. Truly incredible! If you haven't stopped by to visit Debbie yet, please do...... you won't be disappointed!! Oh, oh! And check out my little bio on her website!! I am tickled! :) Thank you so much for stopping by for a visit and reading my exciting news! I truly appreciate each and every one of you! :)
Zibbet Shop is coming along!
Hi Peeps!! Where have I been? LOL! I don't know! Busy I guess since it's Summer vacation for my kids. I have been working on my Zibbet Store! I decided to go with Zibbet instead of Etsy because of the fees Etsy charges and Zibbet offers a little more as far as features go. I also had a hard time maneuvering around Etsy and discovered that Zibbet is soooo much easier! I added a Zibbet button right below my profile picture on the right sidebar. You can visit me now but I haven't listed anything. I am working on several bracelets as well as some paper creations! I am sooooo excited and can't wait to open......very soon, very soon!! I will keep you posted on my Grand Opening date! :) I hope that you stop by for a visit and let me know what you think! I would really appreciate that. Oh, and spread the word! ;-) Thank you so much and I hope you are having a wonderful July; we're almost into August, can you believe it? Thanks for stopping by for a quick visit. :)
Monday, July 15, 2013
My New Business Venture...
Hiiii! How was your weekend? Were you lucky enough to have some nice
weather? We had gorgeous weather all weekend; an awesome reprieve from
all the rain we've been having! I made a decision this weekend that I
would love to share with you! I will be opening an Etsy Shop!! I don't
have an opening date yet because I am still working on some projects. I
have been toying with this idea for a few months after many questions
on various projects that I have featured on my You Tube
channel as well as on my blog. I have been asked about my smash books,
my jewelry, my journals, and I am excited to say that I am finally
biting the bullet. I will share some of what you might see in my Etsy
Shop. These are previous projects that aren't for sale but I figure
they are great samples. In the video below, I shared a smash book that I made. I will be making smash books such as the one you see below. I think the most requests have been about this project!
So I will share several photos below just as a sampling of some of the items I will be selling. I hope you see something you like! :)


 So this is just a small sampling. I will also be accepting custom orders, again for projects you have seen before. I am so excited and I hope you'll stop by for a visit when I open my new shop! Thank you so much for stopping by today and be on the lookout for updates and an opening date! Have an amazing day!


Thursday, July 11, 2013
Design Team Project for Ephemera's Vintage Garden-Number 2
Hi Everyone! I hope you are having an amazing day wherever you are! The sun is finally shining and it's gorgeous out. Today I have my second project for Ephemera's Vintage Garden. This was so incredibly fun to make and surprisingly, didn't take me that long. I am using Coral Blues. The set is called Scrapbook and Journal Card Set. If you click here, you can check out the designs. It is an add on to the Coral Blues Journal Kit. As you can see, you can use this set for more than just paper crafts!


I used Tim Holtz Fragments and adhered the design paper to one side with Judikins Diamond Glaze. You could use Glossy Accents as well, I just didn't have any in front of me at the time.
 For this one below, I adhered the punched butterfly to the back first, and then I adhered it to the polka dot paper.

 For this one below, I adhered the punched butterfly to the back first, and then I adhered it to the polka dot paper.
Once they were completely dried, I cut them out using scissors, and then I sanded the edges a little to clean it up.


Then I used Tim Holtz Distress Ink in Walnut Stain to ink around the edges of the paper to eliminate the white core showing. Then I adhered more designer paper and Tim Holtz word stickers to each charm. Again, I went around each one with Walnut Stain. Once I was done with that, I put a layer of Diamond Glaze on top and let them dry for a few hours.


Here is the completed bracelet.


And here's the other side with the words...


I hope you enjoyed my project today and I hope that it inspired you to think outside the box! Thank you so much for stopping by! Have an amazing day!
Here is the video!
Here is the video!
Wednesday, July 10, 2013
Altered Mini Composition Books for a Swap
Wow! Would you agree I have been on a blogging roll lately? I am sorta proud of myself! LOL! I do seem to blog in the middle of night though, isn't that funny? LOL
Tonight I am sharing two Mini Composition Books that I altered for my swap partner Tracy. I must say that I haven't done these before and they are rather fun!! They are also addicting! I have made a third and have started a fourth! LOL!
These books I picked up at my local grocery store and they are great because they are stitched books rather than glued ones. I hear that the stitched one hold up a bit better than the glued ones, so hopefully Tracy doesn't have any problem with these. The first one I made I used Pink Paislee-Spring Jubilee 6x6 paper pack. I love this paper! It is so colorful, yet subtle.

The little strip of white daisies you see hanging from the top is actually a bookmark! I just draped it over the front for the picture. I used two flowers from Recollections, a soft pink pearl bead, and also seed beads around the pearl. I adhered the seed beads with Judikins Diamond Glaze.

I added tabs to this book using my Stampin UP Round Tab Punch. On the pages with tabs, I added patterned paper as well.

Here is the back...

I love this little stamp I found at a local stamp store many years ago. There was a frame perfectly positioned on the designer paper just for it! I added it to the inside back cover.

For her second book, I used My Mind's Eye Fine and Dandy Boy 6x6 paper pad. To me, this paper didn't scream "just boy." I decided to use it because of the soft color palette. Not to mention that it's wicked cute! :)
 I used Recollections flowers and a little wood veneer heart. So cute!


Tonight I am sharing two Mini Composition Books that I altered for my swap partner Tracy. I must say that I haven't done these before and they are rather fun!! They are also addicting! I have made a third and have started a fourth! LOL!
These books I picked up at my local grocery store and they are great because they are stitched books rather than glued ones. I hear that the stitched one hold up a bit better than the glued ones, so hopefully Tracy doesn't have any problem with these. The first one I made I used Pink Paislee-Spring Jubilee 6x6 paper pack. I love this paper! It is so colorful, yet subtle.


This book has a bookmark as well. :)

I added a ribbon closure to this one...

I hope that Tracy likes them! I really enjoyed making them for her; they are super fun and easy to do! Thanks for stopping by for a visit!! I truly appreciate you all!! :)
Monday, July 8, 2013
Swaps Received-Altered Mini Composition Books
Hi again! Second post for tonight! I had to showcase my swaps in separate posts. They are just so pretty and it's only fair that they have their own spotlight. :) I was in a swap with Tracy, who I met in a facebook group. We swapped Mini Composition Books and we decided to swap two different books. She is from the UK so hers are a tad bigger than what we have here and I LOVE them! I sooooo love the paper she used! Here is the first one.....
 It is so soft and pretty, and feminine. The flowers are handmade and they are just lovely!!

 She included this jumbo paperclip with handmade flowers. Again, it's soooo amazingly beautiful!
 Here is the second one..... I love the lace on this and I just love the large flower. She added a ribbon closure, which is so sweet!
 Here's a closeup of the flower. Isn't it gorgeous??
 Thank you so much Tracy!! I love them both and I will definitely treasure them and use them; they came out perfectly!! :) Thank you so much everyone for stopping by for a visit! I truly appreciate it!!!


Swaps Received-Tiny Junk Journals-Photo Heavy!
Hi Peeps! I hope you had a wonderful weekend! It was a nice long holiday weekend for us. Love long weekends, don't you? How was your holiday? I hope it was fun and safe!
I received some amazing swap items today! I absolutely LOVE opening my mail box and finding crafty goodies from fellow crafters. I was in a swap with two different ladies from facebook. One was for Tiny Junk Journals. I shared mine with you recently, here and here. Debbie and I decided to do two different books. The first one was vintage with torn edges and a gorgeous charm closure.
 I love, love, love CHARMS! I love to make them, I love to see what others make! I just love them!
 Debbie did an amazing job putting these together!
 Here you can see the yummy torn edges that are heavily distressed with ink. Love it!
 She included stamping...
 She included bling...how can you not love it!? LOL!
 The next one is very feminine! Again, I love, love, love it! :) This flower vine is gorgeous! She used seam binding and a leafy vine on the spine, which is very soft actually! Soooo pretty!
 Here is a close up of the flowers, aren't they amazing?
 She added so many elements like tags and chipboard pieces and journal spots....


 This was a great swap, and a awesome partner! I sooooo love these books!! I will cherish them and USE them and always think of Debbie when I do! :) Thanks for stopping by for a visit! Stay tuned for my second post tonight on my other swap goodies! ;-)
I received some amazing swap items today! I absolutely LOVE opening my mail box and finding crafty goodies from fellow crafters. I was in a swap with two different ladies from facebook. One was for Tiny Junk Journals. I shared mine with you recently, here and here. Debbie and I decided to do two different books. The first one was vintage with torn edges and a gorgeous charm closure.


Friday, July 5, 2013
Design Team Project for Ephemera's Vintage Garden
Hi Everyone! Thanks for stopping by today! I have my first project for my Guest Designer spot for Ephemera's Vintage Garden! Yayyy! I was so excited to work with this fabulous journal card kit. It is called Coral Blues Scrap Journaling Card Set. It is absolutely gorgeous! For this first project I had the digital papers printed at Staples on Matte Photo Paper. The print quality is fabulous! I wanted to show the versatility of this set because it can be used for far more than just Project Life journaling cards. This month I will show you the many ways this set can be used!


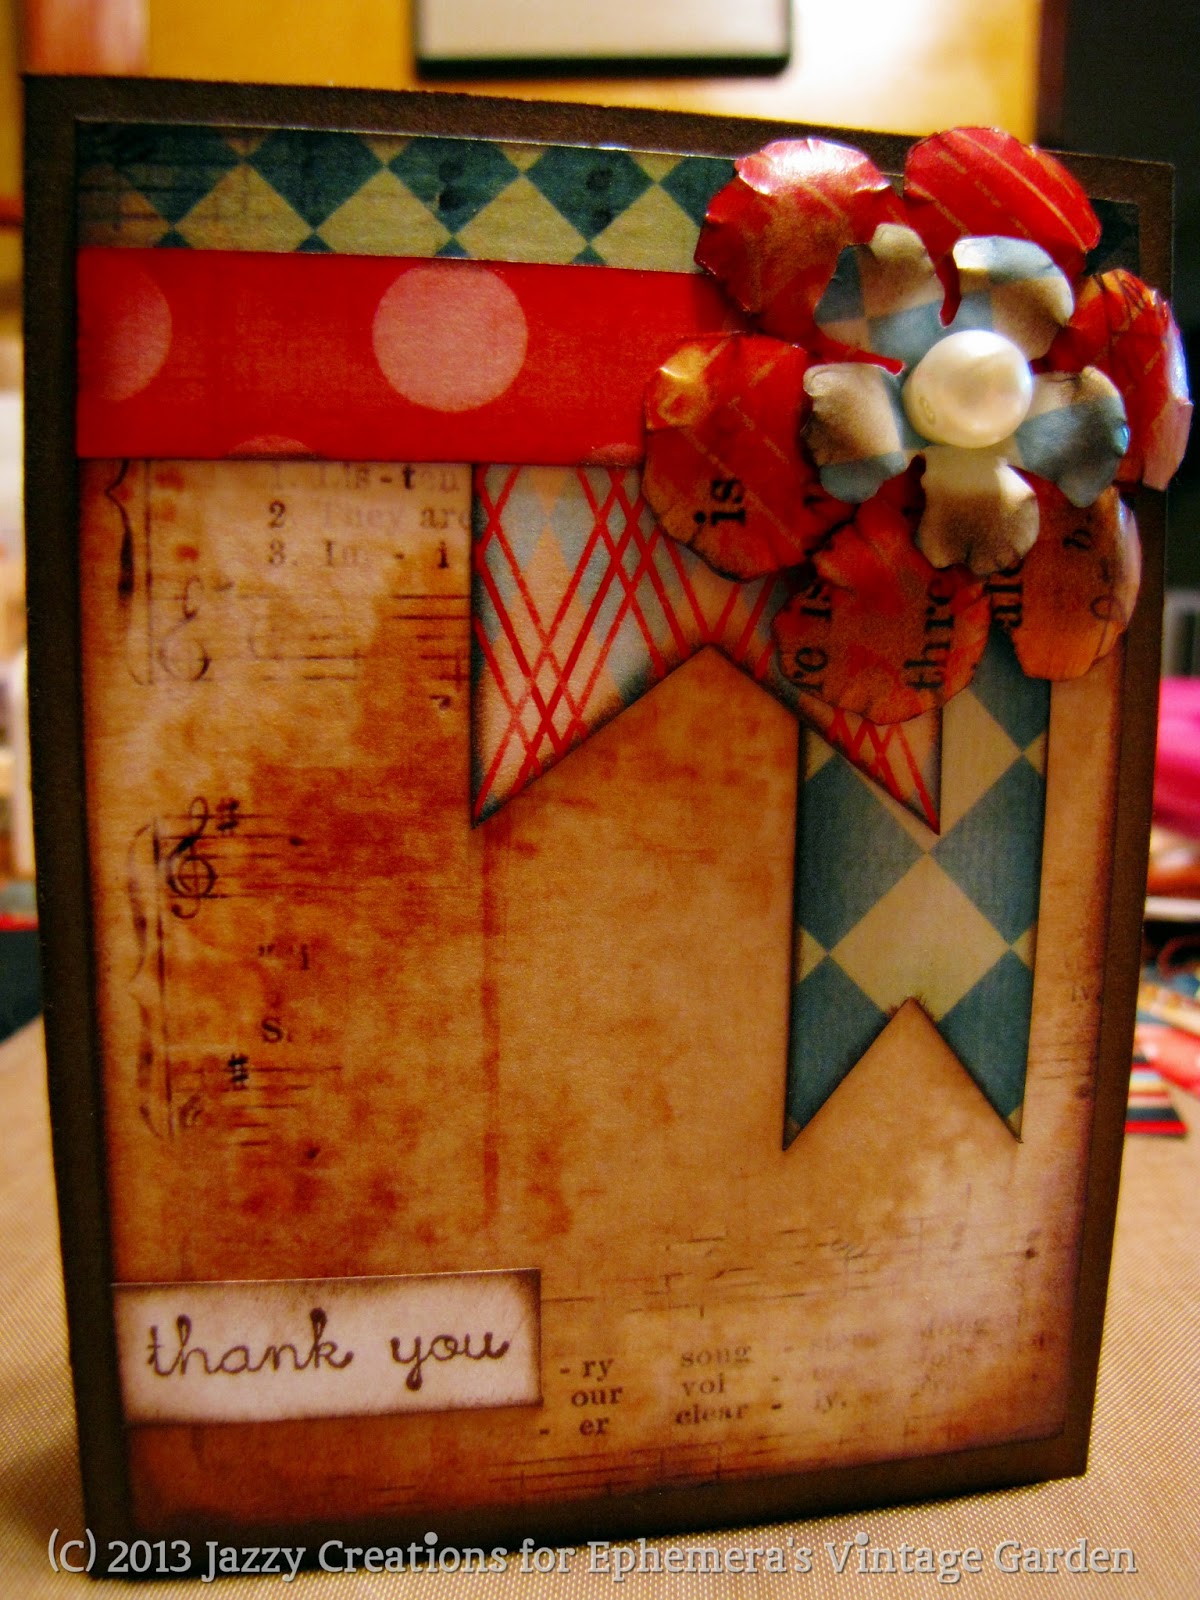
I decided I was going to make a set of Thank You note cards.
First, I cut apart the six 3x4" journal cards, and the accessories. Then I inked all the edges with Tim Holtz Distress Ink, Walnut Stain.
 Next, I used my Tim Holtz Alterations Die, Tattered Florals to cut flowers from the design paper. I knew I wasn't going to use these tabs for this first project so I used those! I placed the tab over the smallest flower in the die, and ran it through my Cuttlebug.


In the photo above, you can see all my flower shapes. I used other small journaling cards from the set to cut the larger flowers. Next, I used my stylus to curl up the edges of each flower.
In the picture below, you see my six "thank you's." I used a stamp from Savvy Stamps. I stamped it using Adirondack brown ink. I inked the edges with Walnut Stain Distress Ink. I then cut them out with scissors.
 Once I had all my pieces cut and inked, I began to assemble my cards. I used Stampin Up card stock in Soft Suede as my card bases. The finished card is 3.25 x 4.25". I used Recollections Signature paper flowers, my Martha Stewart triple Butterfly Punch, an EK Success Butterfly Punch, and a pearl bead for the flower center. I cut a fish tail in one of the strips of designer paper and adhered the sentiment to it.
 This is the inside of the card. The designer paper is SO easy to use! They are gorgeous! You don't have to do anything else.


For my next card, all I did was use pieces from the accessories sheet, like the button and fish tail cut paper. I added embroidery floss to the button, which I punched out using my EK Success 1" Circle Punch. A super simple card to make but really sweet!


For my next card, it was just all about layers. I used one of the 3x4" journal cards as the first layer, then the polka dot strip, which I simply cut from the accessory sheet. I used the argyle fish tail cut paper, and the diamond fish tail cut paper from the accessory sheet. The flowers are cut from other journal cards, and I added a pearl bead to the center.
 This is the inside of that card.


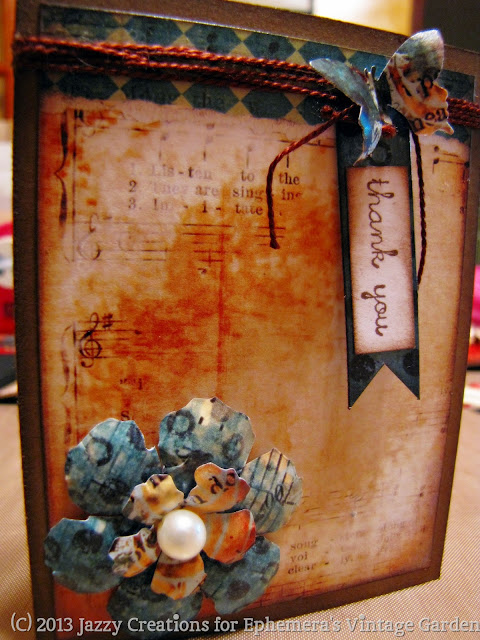
For my next card, I added embroidery floss to the top of the journaling card before adhering it to the card base. I tied the sentiment to the floss before adding the butterfly on top. The flowers again are cut from extra journal cards with the pearl bead.

For my next card, I chose to go really simple but with this paper, it looks like I put a ton of work into it! I used a Recollections flower with a flower I cut from the paper, embroidery floss, a pearl bead, and the fish tail banner hanging from the floss.


And for my last card, I used a 4" doily that I distress with walnut stain, two Recollections Flowers, and a butterfly cut from the designer paper. Isn't it sweet? :)
 Here are the cards together.... I had such a ball making these cards today! I hope you enjoyed seeing them come together and I hope you'll stop by Ephemera's Vintage Garden to pick up your set! :) I will be doing a video on these cards as soon as I get my voice back! I have a cold that has taken it away for the time being! LOL!

What's my next project? You'll have to come back to see! Thanks for stopping by today!!


Subscribe to:
Posts (Atom)